The simplest homemade metal detector. Homemade metal detectors, or how to make a metal detector with your own hands. What types of metal detectors can you make yourself?
A metal detector is used to search for small metal objects in the soil. But a store-bought product of this kind is quite expensive. To assemble it yourself, it is enough to know the principle of its operation and have a little understanding of electrical engineering.
At the same time, the simplest scheme does not allow determining the type of metal; the discrimination function, in other words, determining the type of find, somewhat complicates the design of the metal detector, but at the same time significantly expands the owner’s capabilities when searching.
To assemble a metal detector with metal discrimination with your own hands, you need to have basic knowledge and be able to work with a soldering iron. The cost of a self-assembled device will be lower than that of a factory-made analogue.
General structure of the metal detector
Metal detectors generally operate on the principle of electromagnetic induction. The transmitting coil generates electromagnetic radiation that penetrates the ground. Reception - receives signals from metal objects located in the ground. Often the functions of both coils are combined into one - a transceiver search coil. The control circuit generates an audible signal indicating that a metal object has entered the search zone; in addition, a visual indicator in the form of a lamp or LCD panel can be used.
Metal detectors are usually assembled according to a classical design and consist of the following main parts:
- search transceiver coil;
- generator of electromagnetic radiation;
- vibration receiver;
- decoder, whose task is to isolate the noise background of an object from the general noise;
- rods on which the equipment is fixed;
- indicator system: sound and visual signaling device.
All elements of the search structure are placed on a bar; the length of the bar is selected based on the anatomical characteristics of the owner.
A discriminator, in other words, a determinant, based on the properties of the object’s material, is usually built into the control circuit; its task is to more accurately determine the characteristics of the find based on disturbances in the electromagnetic field.

Operating principle
The generator creates an electromagnetic field with predetermined characteristics around the search coil. The shape of the field and its depth depend both on the characteristics of the generator and on the shape of the coil itself.
When searching, if there are no disturbances in the electromagnetic field, nothing happens. But when a conductive object enters the electromagnetic field zone, it creates Foucault currents. When a disturbance hits the receiver, it must determine the approximate type of object and transmit information about it to the alarm device. The same story happens when an object with ferromagnetic properties appears in the search field. The characteristics of the soil affect the search field, but at the same time, with the correct settings of the characteristics of the metal detector, more precisely the radiation parameters, this interference can be minimized.
Important! Metal discrimination is one of the functions of a metal detector, which allows you to determine which category a find belongs to. It works by separating the material of an object according to the conductivity of electromagnetic waves. This will eliminate various debris and ferrous metals from the search area.
Self-assembly of a metal detector
There are several working circuits of a metal detector intended for self-assembly: from the simplest “Pirate” type to the more complex “Chance” type, with metal discrimination. The latter is worth talking about in more detail.
The main thing in any metal detector is the coil. You can use either a factory-made coil from a store or make it yourself. To work, you will need copper winding wire 0.67-0.82.
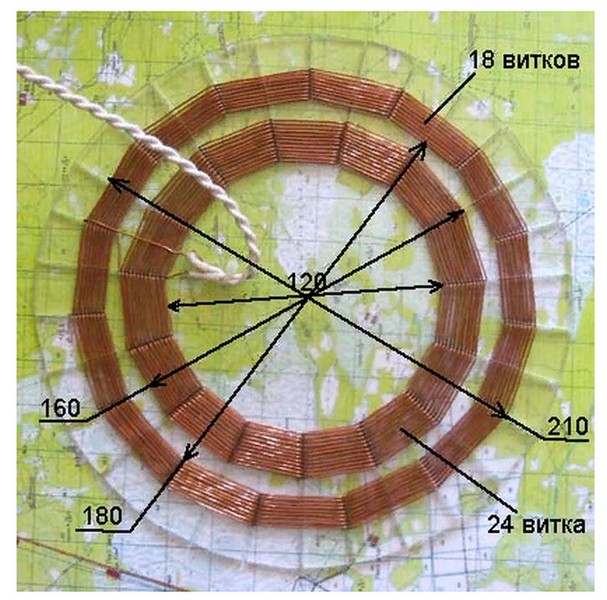
You can make a simple coil of 90 turns of winding wire for a 100-1200 mm mandrel, but with such a coil design, discrimination will not work correctly. Therefore, it is proposed to assemble a search coil from two windings: an external one with a diameter of 210 mm from 18 turns and an internal one with a diameter of 160 from 24 turns. For ease of manufacture, marking and winding of contours should be done on a plate made of non-magnetic material, for example, plexiglass or thick cardboard.
In addition, it is worth sealing the winding; for this you can use any non-magnetic materials, this will increase the resistance of the metal of the product to moisture.
We'll take the metal detector control unit from Andrey Fedorov. This scheme has already proven itself on the positive side and has been tested many times.
The printed circuit board can also be made independently: from textolite, with a foil pattern applied using the materials provided below. Usually, skills in working with printed circuit boards are sufficient for this. Drawing conductive paths according to a pre-made sketch is a fairly simple process. An iron or a hair dryer is sufficient for this purpose.
Its base is a microprocessor of the ATmega8 type, with a converter of the MCP3201 type. A microcontroller of this type is quite scarce, but despite this, it is sold in a number of online stores. Finding it and purchasing other components will not cause any special problems. Soldering of the control panel is carried out according to the diagram below.

When soldering, you need to carefully monitor the placement of parts and elements on the board. The circuit is quite complex, and the failure of one or two elements will throw all the work down the drain. Don't forget about safety precautions when soldering.
Important! It is worth clarifying that the circuit uses an ICL7660S voltage converter; the letter S indicates that this converter operates with voltages up to 12V. This is what you need to use; when using the ICL7660, the converter may fail due to overheating.
You can download a drawing of the printed circuit board and a full description of the assembly from this link www.miriskateley.com/.
Materials and equipment
To make a coil, a winding wire with a diameter of 0.6-0.8 mm is used; when winding, you need to carefully monitor its condition to prevent damage to the enamel coating. The base is a circle made of non-magnetic, electrically permeable material with a diameter of at least 250 mm.
A complete list of materials used and the possibilities of replacing them with analogues
| Detail | Analogue | Quantity |
|---|---|---|
| NE5534 | 1 | |
| Converter MCP3201 | 1 | |
| ICL7660s converter | 1 | |
| ATMega8 controller | 1 | |
| Zener diode TL431 | 1 | |
| Voltage stabilizer 78l05 | 1 | |
| Quartz at 11.0592 MHz | 1 | |
| Diodes 1N4148 | KD522 | 10 |
| Diode 1N5819 | KD510 | 1 |
| Diodes HER208 | HER207 | 2 |
| Transistors 2SC945 | 5 | |
| Transistors IRF9640 | 2 | |
| Transistors A733 | 2SA733 | 2 |
| Capacitors, ceramics | 13 | |
| Electrolytic capacitors of different ratings | 8 | |
| Resistors | 27 | |
| Buttons art. SWT5 | 6 | |
| LCD QC1602A | 1 |
Programming the control unit
The firmware is installed via a connection to the USB port of a personal computer. Programming is carried out using the “Gromov programmer”; for firmware you need to find on the Internet the free UniProf program from Mikhail Nikolaev.
The latest version of firmware can be downloaded here radiolis.pp.ua.
Any current source with a voltage from 9 to 12 V is used to power the circuit.
Assembly
The metal detector is assembled on a rod; the control unit is conveniently placed in a housing made of high-strength plastic, on its upper part. The coil is fixed at the bottom of the device. To fix it on the rod, it will be enough to fix the coil wires on a non-magnetic base.
It should be noted that high-quality insulation of the wires and the entire control unit from moisture is necessary. The main use of this device is in the field, which is why this issue is so important.
A homemade metal detector of this type is a rather complex device, but at the same time, its assembled cost is somewhat cheaper than its industrially produced counterparts. This product is highly efficient, quite economical in energy consumption, but at the same time has all the necessary functions for finding treasures or metal objects. The discriminator is sufficient to determine metal-non-metal characteristics and identify non-ferrous metals. According to reviews, when using this type of metal detector, a small coin can be found at a depth of up to 20 cm, a steel helmet of the SSh-40 type can be found at a depth of up to half a meter.
Video
Today we will talk about how to make a highly sensitive metal detector with your own hands at home from scrap materials. We will also consider assembly methods, visual photos, circuit boards, diagrams and drawings of homemade metal detectors and metal detectors with different operating principles
The operation of a metal detector is based on the principle of magnetic attraction. Thanks to this, a magnetic field is created by the device through the search coil, and then the magnetic field is directed into the ground. The second coil of the metal detector receives return signals and reports the find using a tone signaling device. The moment the coil is passed over the ground and a metal object is detected near the magnetic field, the tone will change in pitch. This change in the field means that you are near the search object.
It is necessary to take into account the fact that the larger the coil, the more sensitive the metal detector becomes, although in modern devices it is often necessary to install small search heads, but equipped with powerful circuits. But how can you make it yourself and for free?
There are four types of metal detectors:
1. Ultra Low Frequency (ELF) finder: The simplest of the home remedies, it is not difficult to make. Has the ability to track various metals (with special settings). The most widely used type.
2. Pulse metal detector (ID): a deep device, capable of detecting objects located very deep. Popular among professional gold hunters because it is primarily tuned to non-ferrous metals.
3. Beat detector: can detect any metal or mineral in the range of its pulse (to a depth of up to 1 meter), if you make it yourself, you can distinguish only metals of a certain group. This is the cheapest and simplest type of device.
4. Radio Detector: Can detect metals hidden up to 1 meter in the ground. It is made very quickly, within a few minutes, this is the best option for demonstrating the principle of operation of the device or for presenting it at children's art fairs. He's not that popular.

Regardless of the type of metal detector you plan to make yourself, most detectors have a similar design assembly. What and how can you make the most primitive metal detector?
1. Control box: consists of a board, microspeaker, battery pack and microprocessor.
2. Holder: connects the command block and the coil. Often reaches the size of a human being.
3. Magnetization coil: this is the part that senses the metal, as well as the source of the MF. Also known as a "search head", "loop" or "antenna", it consists of disks.
4. Stabilizer (optional): needed to control the position of the detector.
Making a high frequency metal detector
A high-frequency metal detector differs from other models in that it uses two coils at once:
· transfer coil: the outer circuit of the coil that contains the wires. Electricity is transmitted through these cables, which creates a magnetic field.

· receiving reel: a reel with a coil of wire. This part receives, processes and amplifies the frequencies coming from the metal in the ground, and, therefore, signals the discovery of treasure.
Step-by-step instructions, photos and diagrams for beginners on how to make a high-frequency metal detector:
1. You need to assemble a command block. It can be made from a computer, laptop or radio.
2. Find the highest AM frequency on the radio. Check that the receiver is not tuned to a radio station.
3. Now we assemble the search head. To do this, cut out two circles from an ordinary thin plywood sheet. One is about 15 centimeters in diameter, the other is slightly smaller – 10-13. This is necessary so that one ring can fit into another. Now you need to cut out small wooden sticks to position the rings parallel to each other. .
4. From these plates we take 10-15 turns of enameled copper wire with a cross-section of 0.25 mm from the outer circle. Now you need to attach the structure to the block.
5. Pole connection. Mount the head on the bottom end, radio detector on the top.
6. Now you need to turn on the radio frequency, you should hear a faint tonal sound. You may need to do a little work with the radio settings. If necessary, you can attach headphones to the kit for better audibility.

Assembling a pulse detector
You need to assemble the control unit. Hack a regular transistor type radio to find usable parts. We will need:
· 9 volt battery;
· Amplification transistor 250+;
· A small 8 ohm speaker will do.

Assembling the search coil
You need to cut 3 rings from 3mm plywood, the diameter of one is 15 cm and the diameter of two is 16 cm. Use wood glue to make a sandwich, with a 15cm circle in the center.
Along the edge, equip the plywood with 10 turns of wire, as in the method above.
Setting up a radio station. Make sure the tone is sounding and the radio is out of range.
Turn on the block. You may need to tilt it. Also, before making a metal detector with your own hands, you need to check the board settings; perhaps it will not detect metals due to the board settings.
Attach the search head to the shaft. Test your metal detector on a plug or other metal parts. Important: before you make a powerful metal detector with your own hands, you need to select a higher-frequency receiver, in which case we advise you to buy a special unit for the detector in a radio store or take the Terminator metal detector as a starting point.
In principle, everything is quite simple, you just need to find everything you need and make a metal detector at home yourself. Here's another way:
1. To make a metal detector at home, you will first need to find an empty box from a regular CD.
2. Now you need to find the radio and glue its back wall to the first flap of the disc box. For this purpose, you can use double-sided tape or special adhesive tape.

4. Now that such a device is almost ready, it’s time to start setting it up. Turn on the radio and make sure that the device is working, and that it is operating on the AM band. At the same time, it is also necessary to ensure that no other radio stations operate on this frequency. Now you should make the sound bigger and make sure that you don’t hear anything else except noise from the receiver.
5. Now we check the functionality of the created metal detector. We begin to close the box. At a certain moment you will hear a strong sound. This means that the radio was able to pick up the electromagnetic waves that were emitted by the calculator.
6. When you open the box slightly, this noise will disappear. Now it is enough to open the box slightly so that the noise is not strong, but audible. In this position, present the box to any metal object. After this, you can hear this loud noise again. A loud sound indicates that the metal detector model is working. In this case, you can use it to look not only for metal things lost in the house, but also to go to the forest or to another place in order to find something interesting, and maybe even precious. But it’s still better to use such a device at home.

Even the simplest DIY metal detector needs an inductive coil. It is a ring with a diameter from 6-8 cm to 14-16 cm, depending on the size of the metal objects to be looked for. To make a homemade coil, take a blank of a suitable diameter, onto which an enameled copper wire with a cross-section of 0.4-0.5 mm is wound. The number of turns can be calculated using a well-known formula that takes into account the diameter of the coil. After winding, the coil is carefully removed from the workpiece and secured with insulating tape. It will protect it from mechanical damage and atmospheric moisture. After this, a foil screen is wound over the coil with a gap of approximately 10-15 mm in length.
The resulting screen should not be a short-circuited loop. A tinned copper wire must be wound over the screen in 1 cm increments, which is connected to the braid of the coaxial cable leading to the electronic unit. The coil is connected to the circuit with a two-wire coaxial cable.
It is recommended to make several coils with different internal diameters, which will allow them to be connected for each specific case. In conclusion, all that remains is to design the metal detector structurally: place the electronic unit in a sealed case, protected from moisture and dust, and install the inductive coil on the end of a non-metallic pole of the required length. A small speaker or headphones can be used as a source of sound signal generated by an electronic circuit if the device is to be used in noisy places. The device is powered from an autonomous current source - a battery or accumulator.

A deep homemade metal detector differs from a surface one in its higher sensitivity, which allows you to find metal objects at depths of up to several meters. In addition, such devices provide selectivity, allowing small objects to be ignored. In technological terms, such a device is no different from the one described above. As a rule, the inductive coil for a deep metal detector is made of a larger diameter (up to 300 mm) and has better protection from external interference. Setting up such a device may require the use of electronic measuring equipment. This will allow you to achieve the required level of sensitivity of the device.
Any metal detectors operate based on the principles of “Foucault currents” known from the school curriculum. We will not go into details of the experiments. When the search coil and a metal object come closer, a change in frequency occurs in the generator, which the device reports with an audio signal. If you hear a squeaking sound in your headphones, it means there is something metal lying underground. Modern inventors are working on two tasks: increasing search depth; improvement of identification parameters of devices; reduction of energy costs; convenient operating characteristics.
How to make a metal detector at home? It’s worth getting a little acquainted with electronics and reading physics for the 7th grade of high school. Experience with some tools and available materials will be useful. It is necessary to study and test a number of electrical circuits in order to choose the one that will really work

Materials you will need for work:
small generator (from an old tape recorder); quartz resonator; film capacitors and resistors; vinyl or wooden ring for the search coil; plastic, bamboo or wooden cane holder; aluminium foil; wires for coil winding; piezoelectric emitter; metal box – screen; headphones for receiving sound signals from the device; two identical transformer coils; 2 Krona batteries; perseverance and patience.
Sequence of assembling a search metal detector A search coil is made from a plywood circle with a diameter of 15 cm: the wire is wound in turns (15-20) onto a template. The stripped ends are soldered to the connecting cable. A layer of thread is wound around the perimeter of the coil over the wire for fastening. All parts of the circuit are soldered on a PCB board in the following order: capacitors, resistor system, quartz filter, signal amplifier, transistor, diodes, search generator. A soldered board is inserted into the prepared case, connected to the search coil and mounted on a holder stick. The signal from the search coil reflected by a metal object increases the frequency of the generator. Amplified by a quartz filter, it is converted by an amplitude detector into a constant pulse that produces sound.

The principle of operation of a metal detector comes down to the fact that when a metal object approaches the inductor coil of the generator - the main unit of the device - the frequency of the generator changes. The closer the object and the larger it is, the stronger its influence on the frequency of the generator.
Now let’s look at the design of a simple metal detector assembled using two transistors. Metal detector circuit The generator is made on transistor VT1 according to the three-point capacitor circuit. Generation is formed due to positive feedback between the emitter and base circuits of the transistor. The frequency of the generator depends on the capacitance of capacitors C1-C3 and the inductance of coil L1. As the coil approaches a metal object, its inductance changes - it increases if the metal is ferromagnetic, for example iron, and decreases if the metal is non-ferrous - copper, brass.

But how can you monitor the change in frequency? For this purpose, a receiver assembled on a second transistor is used. This is also a generator, assembled, like the first one, according to a three-point capacitive circuit. Its frequency depends on the capacitance of capacitors C4-C6 and the inductance of coil L2 and is not much different from the frequency of the first generator. The required frequency difference is selected using a coil trimmer. In addition, the cascade on transistor VT2 also combines the function of a detector that identifies low-frequency oscillations of high-frequency oscillations arriving at the base of the transistor. The detector load is BF1 headphones; capacitor C1 bypasses the load for high frequency oscillations.

The oscillatory circuit of the receiver is inductively coupled to the generator circuit, therefore, currents flow at the frequency of both generators, as well as a current of the difference frequency, in other words, the beat frequency, in the collector circuit of transistor VT2. If, for example, the frequency of the main generator is 460 kHz, and the frequency of the receiver generator is 459 kHz, then the difference will be 1 kHz, i.e. 1000 Hz. This signal is heard in phones. But as soon as you bring the L1 search coil closer to the metal, the sound frequency in the phones will change; depending on the type of metal, it will either decrease or become higher.
Instead of those indicated in the diagram, P401, P402 and other high-frequency transistors are suitable. Headphones are high-impedance TON-1 or TON-2, but their capsules must be connected in parallel so that the total resistance is 800...1200 Ohms. The sound volume in this case will be slightly higher. Resistors - MLT-0.25, capacitors - KLS-1 or BM-2.
Coil L1 is a rectangular frame with dimensions of 175x230 mm, consisting of 32 turns of PEV-2 0.35 wire (PELSHO 0.37 wire is suitable).

L2 coil design. Two cylindrical paper frames 6 contain pieces of a rod with a diameter of 7 mm made of 400NN or 600NN ferrite: one (1) 20...22mm long, permanently fixed, the other (2) 35...40mm (movable - for adjusting the coil). The frames are wrapped with paper tape 3, on top of which a coil L2 (5) - 55 turns of PELSHO wire (possibly PEV-1 or PEV-2) with a diameter of 0.2 mm is wound. The coil terminals are secured with rubber rings 4.
Power sources - battery 3336, switch SA1 - toggle switch, connector X1 - two-socket block.
Transistors, capacitors and resistors are mounted on a board made of insulating material. The board is connected to coils, a battery, a switch and connector, and an insulated stranded wire. The board and other parts are placed in a glued plywood case with dimensions of 40x200x350 mm. Coil L1 is attached to the bottom of the case, and coil L2 is placed inside the coil at a distance of 5...7 mm from its turns. A board is attached next to this coil. The connector and switch are attached from the outside to the side wall of the case. A wooden handle about a meter long is attached to the top of the case (preferably with glue).
Setting up a metal detector begins with measuring the operating modes of the transistors. Having turned on the power, measure the voltage at the emitter of the first transistor (relative to the common wire - the power plus) - it should be 2.1V. More precisely, this voltage can be selected using resistor R2. Then measure the voltage at the emitter of the second transistor - it should be 1 V (set more precisely by selecting resistor R4). After this, by slowly moving the tuning core of the L2 coil, a loud, clear, low-frequency sound appears in the headphones.
By bringing a tin can closer to the search coil, the beginning of a change in the sound tone is recorded. As a rule, this occurs at a distance of 30...40 cm. By more accurately adjusting the frequency of the second generator, the highest sensitivity of the device is achieved.

Frequency generators of 160 kHz and 161 kHz, respectively, are assembled on elements IC1.1 and IC1.2. Where C1, L1 is the oscillatory circuit of the first generator, C4, L2 is the oscillatory circuit of the second generator. The inductance of the second generator L2 is a search coil. A mixer is assembled on element IC1.3, at the output of which we obtain a frequency difference between the generators equal to 1000 Hz. When a metal object appears near the search coil, its inductance changes and changes the frequency of the generator, which in turn changes the frequency at the mixer output. Variable resistor R5 is a volume control. Element IC1.4 is used as a buffer amplifier stage, cutting off unnecessary frequencies and amplifying the signal. A push-pull amplifier is assembled using elements VT1, VT2, VT3, designed to work with headphones with a resistance of 32-200 Ohms.
The IC1 chip is of the CD4030 type. It can be replaced with any other chip OR CMOS technology. VT1, VT3-BC547, VT2-BC557. All electrolytic capacitors are rated at 16V. Resistors with a power of 0.125W. Supply voltage - 6V.
Coil L1 - inductance 100 mH.
Search coil L2 - 140 turns of wire with a diameter of 0.8 mm, coil diameter - 150 mm.
Tuning comes down to tuning the generators to frequencies of about 160 kHz with a difference of 1 kHz.
When a metal object enters the working area of the coil, the inductive coupling between the coils changes. In this case, a signal appears at the terminals of coil L2, limited in amplitude (if the object is large) by diodes VD1 and VD2, which is subsequently amplified by the action of the operational amplifier DA1.1.
At the output of the filter, which is built on this operational amplifier, a constant voltage appears, increasing as the coils approach the metal target. Next, the voltage goes to the inverting input in the comparator DA2.1. It compares this voltage with the reference voltage supplied to its second input.
When the comparator is triggered, its output voltage decreases, this leads to the closure of transistor VT3, and the sound generator made on the basis of the DA2.2 microcircuit is activated. From the sound generator the signal goes to the amplifier, and from there to the main telephone from the hearing aid. You can adjust the volume using variable resistor R38.
To wind the coil, a circle with a diameter of 14 cm is used. For each coil, 200 turns of copper wire with insulation are supposed to be made. The wire should have a diameter of 0.27 mm and should be removed from the middle of the coil. Before removing the finished spool from the frame, you need to bandage it, and after removing it, wind the thread around it so that the turns fit more tightly to each other. The removed coil is configured as in Figure 2 and secured with threads to a plastic plate. There should be a transmitting coil at the bottom, and a receiving coil at the top.
The take-up coil must have an aluminum screen with a hole designed to prevent short-circuited turns. It is necessary to connect the coil leads to the device using a shielded cable. The vertical turns of the coils should be separated by distances of 25 mm. The last step is to secure the coils with glue or sealant.
Our company provides rental services for personnel who have undergone careful selection and special training. We have extensive experience in the field of leasing labor resources, so we perfectly understand the needs of small and medium-sized businesses that need to increase the number of employees in the shortest possible time. With our help, you can quickly assemble a close-knit team of qualified specialists or select temporary personnel to work in various industries. We are regularly contacted by managers of construction companies and industrial enterprises, retail chains and small shops, public catering facilities and other organizations operating in Moscow and the Moscow region.
You can order different types of services from us, including:
- outsourcing of the sales department, online store, personnel records management, etc.;
- outstaffing of managers, lawyers, general workers, drivers and other specialists;
- rental of security personnel or marketing department.
Each service is provided after signing a formal cooperation agreement. This agreement clearly states the number of workers and their qualifications, the deadline for completing the work and other points that are agreed upon with the customer. If the agreement provides for the complete transfer of part of the business tasks to external services, then our specialists sign an additional contract on the non-disclosure of confidential information obtained in the course of performing their functional duties.
Outstaffing of personnel on favorable terms
Key advantages of cooperation with our company:
- High level of service. We are constantly working to improve the quality of our services, so every person who decides to order temporary rental, outsourcing or outstaffing from us can count on attentive attention and an individual approach.
- Large database of applicants. We carefully check each employee. Our specialists conduct interviews and monitor the authenticity of documents. If for some reason an employee is not suitable for the company that orders our services, we can replace personnel taking into account the personal wishes of the customer.
- Strict compliance with obligations to the client. We care about our own reputation, so you can be sure that all clauses of the cooperation agreement will be fulfilled exactly on time.
Equipment and materials
To assemble a homemade metal detector with your own hands, you will need the following components and tools:
- Chip. Both domestic, type KR1006RVI1, and its foreign analogue are suitable ( NE 555)
- Copper wire for coil winding
- Transistors of various formats ( BC 547, IRF 740, NPN, etc.)
- Finished printed circuit board or material for its manufacture
- A plastic or metal tube long enough to be used as a barbell
- The material for all body elements is durable plastic
- Consumables: any suitable fasteners, electrical tape
- Equipment: soldering iron, screwdrivers
This is the minimum set, which will be enough to assemble a simple device. This device is perfect for beginner treasure hunters.
Assembling the device
To assemble the simplest metal detector, you need to go through several steps.
PCB assembly
Electronics are traditionally the most complex part of any device. In this case, it is impossible to do without microcircuits, so it would be logical to start the assembly with a printed circuit board.
For a simple metal detector there are two PCB options:
- Chip board NE 555 (or similar domestic
- Transistor board.
Even if you assemble it yourself, it is still better to purchase a printed circuit board ready-made. They can be found in any radio electronics store. The fact is that even if the master decides to assemble a printed circuit board himself, to make it he will need to buy materials that are hardly possible to make himself, such as getinaks - pressed paper boards.
Installing electronics on the board
Next, the master’s task is to install all the electronic elements on the board. The main condition here is to strictly follow the electrical circuit diagram of the metal detector. The further operation of the entire device depends on the accuracy of soldering.
To increase the stability of the metal detector, it is recommended to additionally install film capacitors on the board. They have increased thermal stability. This is especially true for use in cold weather, for example, with frequent searches in the fall.
Power supply
Powerful circuit a homemade metal detector is provided by any power source with a total voltage of 9 to 12V. But it is believed that the sensitivity of the device is better when using a 12V power source. This can be either a battery or several batteries. You can even reuse unwanted laptop batteries.
It is worth noting that even with the simplicity of the circuit, the device ends up being quite powerful and consumes a significant amount of energy. During long-term searches, you should take care of the availability of spare batteries, and it is best to use rechargeable batteries, which will avoid troubles with the batteries draining at the most inopportune moment.
Coil assembly
Since the assembled device is a pulse device, the accuracy of the coil assembly is less important here. The best option is to use a frame with a diameter of about 200 mm. You need to wind 25 turns of copper cable. After winding is completed, the coil must be additionally wrapped with any electrical tape. This will provide additional protection from moisture.

To make the coil more sensitive, you can increase the frame diameter to 250 mm, while simultaneously reducing the number of cable turns to 21-22. After winding and insulating the coil, it must be installed on a rigid base. It is extremely important that it is made of non-metallic material. Impact-resistant plastic can be used. Such a coil will become more sensitive to non-ferrous metals, and with minor additional modifications it will theoretically be able to produce signals from precious metals that do not lie too deep in the soil.
Encapsulating the coil in a durable housing is very important because it is located at the very bottom of the boom and often comes into contact with the ground, low-growing plants, grass, rocks and debris. This way the coil is reliably protected from impacts.
The leads from the coil must be soldered to a wire, or better yet, to a twisted pair.
Device setup
If the assembly was carried out according to detailed instructions, then the metal detector does not need additional settings, since by default it will have the highest possible sensitivity. But if finer tuning is needed, you can twist the resistor R 13, achieving rare single clicks in the device's dynamics.
But if this effect can be achieved only in the extreme position, then it is better to change the resistor to R 12. Clicks in the dynamics during normal operation should occur in the middle positions. If you have an oscilloscope, this device can easily measure the frequency and speed up the setup process.
The frequency for normal operation should be approximately 130-150 Hz.
Working with a metal detector
Immediately after turning on, you need to wait a little (about 15 seconds) for the device to stabilize its operation. By adjusting the resistor R 13 until the desired state, you can proceed directly to search operations.
Make a metal detector at home
Not everyone knows how to make a metal detector with their own hands at home.The basis of the operation of any metal detectors is the transmission and response reception of electromagnetic waves. The key elements of this type of device are two coils (sometimes combined into one). The first coil is transmitting, the second is responsible for receiving the response signal emanating from detected objects.
The metal detector works on the following principle:
Power magnetic rays emanating from the device pass through metal objects, which creates an additional (secondary) magnetic field. The receiving coil detects the appearance of such a field and sends information about this to the control unit, which activates the warning system.
Based on their operating principle, such devices can be divided into:
· Simple. The cheapest devices that operate according to the banal but effective principle of “transmission-reception”.
· Induction. These are exactly the kind in which two coils are combined into one common one.
· Pulse. They work based on a pulse emanating from a transmitter. After releasing a pulse, it immediately turns off and turns on when it is necessary to generate a new pulse.
There is another classification of devices based on their technical features:
· Dynamic. A device that is simple in design and operation, continuously scanning the coverage area of the created field. The key principle of working with such a metal detector is the need to constantly be in motion, otherwise the signal disappears. The disadvantage of such finders is a rather low level of sensitivity.
· Pulse devices. They have increased sensitivity, but require experience and additional configuration skills. Sometimes such a device is equipped with several coils at once, each of which is applied to different types of metals and soil in the area where the work is being carried out. Among metal detectors of this type, the most popular are electronic devices that operate at a low frequency level - around 3 kHz.
· Electronic. Such detectors are good for searching for large metal objects, having a good level of sensitivity. However, on the other hand, they can miss small artifacts, since they are often configured to ignore small signals, most often emanating from unnecessary objects, such as metal debris.
· Deep The detector is designed to search for objects located at significant depths underground. Such devices are capable of detecting a signal even at a depth of 6 meters, while others most often operate at a depth of no more than 3. This device operates on the basis of two coils, like others. But here their position relative to the earth's surface has been changed. One of them is located parallel to the ground, the second is perpendicular.
· Another option that is of less interest to search engines is stationary metal detectors. These are nothing more than frames that can often be seen at especially important objects: stadiums, metro stations. They are ways to calculate the presence of any metal products in bags and internal people who pass through the installed frame.
The simplest of metal detectors, which base their work on the “transmission-reception” principle, also have a simple design and assembly principle, so these devices are best suited for making with your own hands. What is important here is only the competent selection of parts in accordance with the instructions, and the presence of minimal experience in working with radio electronics.
How to make a metal detector with your own hands
Making a metal detector from domestic parts for beginners is best considered on the basis of the “Pirate” model. This option has long been among the top homemade metal detectors. It is widely in demand among DIY enthusiasts, and in its finished form it is a device with good search depth and accuracy indicators. It allows you to detect objects at a depth of up to 1.5 meters, which can be called a good indicator for devices with such a simple design.
Among devices of this level there is another scheme based on frequency beats. But if you compare the characteristics of the “Pirate” with the devices in this diagram, the comparison will be in favor of the “Pirate”. In addition, the design of this metal detector is also easier to assemble and consists of fewer parts and components.
One of the possible disadvantages of this model is the lack of a discrimination function. A simple metal detector circuit simply cannot provide the ability to connect a discriminator. But with experience, seekers learn to independently determine which metal produces a signal from field vibrations.
Metal detector device "Pirate"
This detector is a pulse type device. To understand how to assemble such a device yourself, you need to know how a metal detector works, and then you will need to purchase:
· Long plastic tube for a barbell. All other equipment will be attached to it. PVC water pipes work well in this case.
· Material for the control unit housing. You can use any suitable size container made of durable plastic.
· Speaker. Anything, for example, a small Chinese portable radio, will do. The main condition is a resistance level from 8 to 50 Ohms.
· Headphones with jack mini-jack (3.5 mm ). Any headphones from your phone will do, mp 3-player or any similar device
· Copper cable on reel
· Electrical tape
· Transistors of various types: BC 547, IRF 740 and BC 557
· Two microcircuits: K157UD2 and NE 555
· Capacitors. It is better to use ceramic and film.
· Electrolytic capacitors, 5 pieces in total.
· Resistors of various resistance levels

“Pirate” is a metal detector based on two microcircuits. This is where the chip is used NE 555 or its domestic equivalent.
The operation of the device begins with a comparator. One of its outputs is connected to the generator (creating the electromagnetic field), the other to the receiving coil, and the third to the speaker for sound signaling.
When metal objects are detected within the created field, a signal about this from the receiving coil is sent to the comparator, and then to the speaker, which emits a corresponding sound alarm.
The finished assembled board, with the elements placed on it, is placed in a regular junction box. You can make it yourself from durable plastic, or you can buy it at any radio equipment store.
If a standard device is not enough, then there is an option to make a more advanced model for gold. The power of a device assembled according to a conventional circuit is not enough to react to gold and objects made from it, so it is easy to find an improved circuit on the Internet.
Can parts from a radio be used?
To create a signal in this model, transistors of the KT-361 and KT-215 samples are perfect. These are USSR-style parts and can be found in any old radio, or in any radio equipment from those times.
Build the Pirate finder circuit board?
You can make a printed circuit board for such a device yourself, but you won’t be able to do it from scrap materials. To make it you will need a sheet of special material - getinax. It consists of pressed slabs of thick paper impregnated with epoxy resin. Additionally, it must be covered with a special copper foil, which is used in electrical engineering.
You need to transfer all the connecting elements to such a board, mark the places for fastenings and carefully drill holes in them. All tracks must be coated with a special protective varnish, and as soon as it dries, the board must be immersed in a chlorine solution. This gives additional protection to areas where the protective layer of copper foil is thinnest.
Coil assembly
As a base, you need a ring made of any non-metallic material with a diameter of about 200 mm. Even a wooden hoop may work. Copper wire is wound onto the selected base, approximately 30 turns. To increase sensitivity, it is necessary to increase the ring diameter to 250-260 mm, and reduce the number of turns to 20-22.
It is convenient to wind on a pre-prepared board or any flat surface. The distance between the turns must be maintained approximately equal to the diameter of the base. In several places, for reliability, it is necessary to additionally strengthen the coil winding with electrical tape.
The coil is ready, it can be connected to the detector and tested for performance.
Also, the coil can be assembled from a minimal set of available tools in just a few minutes. To do this, in addition to a twisted pair of 2.5 mm cable, you will need a minimum set of tools: a soldering iron, a multitester, a sharp knife and some solder.
The procedure in this case is as follows:
· First, you need to twist the wire into two skeins, leaving about 10 cm on both sides.
· Then, clean the winding, freeing the cable cores for connection.
· Connect the wires according to the diagram; for reliability, solder them with a soldering iron and apply solder.
· Test the presence of a signal using a multitester; attach the ends of the winding to a multi-core cable with a soldering iron.
Assembling the “Pirate” metal detector from ready-made parts
Once all structural elements are ready, full assembly can begin. All parts are attached to a fairly long rod. A comfortable rubber handle is attached to the top, a control unit enclosed in a plastic case is located just below, and a coil is located at the very bottom. If everything is done correctly, no errors were made when assembling the elements - the device is ready for use, no additional manipulations will be necessary.
Deep-type metal detectors are capable of detecting objects in the ground at a great distance. Modern modifications in stores are quite expensive. However, in this case, you can try to make a metal detector with your own hands. For this purpose, it is first recommended to familiarize yourself with the design of the standard modification.
Modification scheme
When assembling a metal detector with your own hands (the diagram is shown below), you need to remember that the main elements of the device are a damper on a microcontroller, a capacitor and a handle with a holder. The control unit in the devices consists of a set of resistors. Some modifications are made on drive modulators that operate at a frequency of 35 Hz. The racks themselves are made with narrow and wide plate-shaped plates.

Assembly instructions for a simple model
Assembling a metal detector with your own hands is quite simple. First of all, it is recommended to prepare a tube and attach a handle to it. High conductivity resistors will be required for installation. The operating frequency of the device depends on many factors. If we consider modifications based on diode capacitors, then they have high sensitivity.
The operating frequency of such metal detectors is about 30 Hz. Their maximum object detection distance is 25 mm. Modifications can operate on lithium batteries. Microcontrollers for assembly will need a polar filter. Many models fold on open-type sensors. It is also worth noting that experts do not recommend using high sensitivity filters. They greatly reduce the accuracy of detecting metal objects.
Model series "Pirate"
You can make a “Pirate” metal detector with your own hands only using a wired controller. However, first of all, a microprocessor is prepared for assembly. To connect it you will need Many experts recommend using grid capacitors with a capacity of 5 pF. Their conductivity should be maintained at 45 microns. Afterwards you can start soldering the control unit. The stand must be strong and support the weight of the plate. For 4 V models, it is not recommended to use plates with a diameter larger than 5.5 cm. System indicators do not need to be installed. After securing the unit, all that remains is to install the batteries.
Using reflex transistors
Making a metal detector with reflex transistors with your own hands is quite simple. First of all, experts recommend installing a microcontroller. In this case, capacitors are suitable of a three-channel type, and their conductivity should not exceed 55 microns. At 5 V they have a resistance of approximately 35 ohms. Resistors in modifications are mainly used of the contact type. They have negative polarity and cope well with electromagnetic vibrations. It is also worth noting that during assembly it is allowed to use the maximum width of the plate for such a modification is 5.5 cm.
Model with convection transistors: expert reviews
You can assemble a metal detector with your own hands only on the basis of a collector controller. In this case, capacitors are used at 30 microns. If you believe the reviews of experts, then it is better not to use powerful resistors. In this case, the maximum capacitance of the elements should be 40 pF. After installing the controller, it is worth working on the control unit.
These metal detectors receive good reviews for their reliable protection against wave interference. For this purpose, two diode-type filters are used. Modifications with display systems are very rare among homemade modifications. It is also worth noting that power supplies must operate at low voltage. This way the battery will last for a long time.

Using Chromatic Resistors
With your own hands? The model with chromatic resistors is quite simple to assemble, but it should be taken into account that capacitors for modifications can only be used on fuses. Experts also point out the incompatibility of resistors with pass filters. Before starting assembly, it is important to immediately prepare a tube for the model, which will be the handle. Then the block is installed. It is more advisable to select modifications at 4 microns, which operate at a frequency of 50 Hz. They have a low dispersion coefficient and high measurement accuracy. It is also worth noting that searchers of this class will be able to successfully work in conditions of high humidity.

Model with a pulse zener diode: assembly, reviews
Devices with pulsed zener diodes are distinguished by their high conductivity. If you believe the reviews of experts, then homemade modifications can work with objects of different sizes. If we talk about the parameters, their detection accuracy is approximately 89%. You should start assembling the device with a stand blank. Then the handle for the model is mounted.
The next step is to install the control unit. Then a controller is mounted, which runs on lithium batteries. After installing the unit, you can start soldering the capacitors. Their negative resistance should not exceed 45 ohms. Expert reviews indicate that modifications of this type can be made without filters. However, it is worth considering that the model will have serious problems with wave interference. In this case, the capacitor will suffer. As a result, the battery of models of this type quickly discharges.
Application of low frequency transceiver
Low-frequency transceivers in models significantly reduce the accuracy of the devices. However, it is worth noting that modifications of this type can successfully work with small objects. At the same time, they have a low self-discharge parameter. In order to assemble the modification yourself, it is recommended to use a wired controller. The transmitter is most often used with diodes. Thus, conductivity is ensured at around 45 microns with a sensitivity of 3 mV.
Some experts recommend installing mesh filters, which increase the security of models. To increase conductivity, only transition type modules are used. The main disadvantage of such devices is considered to be controller burnout. If such a breakdown occurs, it is problematic to repair the metal detector yourself.

Using a High Frequency Transceiver
On high-frequency transceivers, you can assemble a simple metal detector with your own hands only on the basis of an adapter controller. Before installation, a stand for the plate is prepared as standard. The average conductivity of the controller is 40 microns. Many specialists do not use contact filters during assembly. They have high thermal losses and are capable of operating at 50 Hz. It is also worth noting that lithium batteries are used to assemble the metal detector, which recharge the control unit. The sensor itself in modifications is installed through a capacitor, the capacitance of which should not exceed 4 pF.

Model with longitudinal resonator
Devices with longitudinal resonators are often found on the market. They stand out among their competitors by their high accuracy in identifying objects, and at the same time they can work in high humidity. In order to assemble the model yourself, a stand is prepared, and a plate should be used with a diameter of at least 300 mm.
It is also worth noting that to assemble the device you will need a contact controller and one expander. Filters are used only on mesh lining. Many experts recommend installing diode capacitors that operate at a voltage of 14 V. First of all, they discharge little of the battery. It is also worth noting that they have good conductivity compared to field analogues.
Using selective filters
Making such a deep metal detector with your own hands is not easy. The main problem is that a regular capacitor cannot be installed in the device. It is also worth noting that the plate for modification is selected from 25 cm in size. In some cases, the racks are installed with an expander. Many experts advise starting assembly by installing the control unit. It must operate at a frequency of no more than 50 Hz. In this case, the conductivity depends on the controller used in the equipment.
Quite often it is selected with a lining to increase the security of the modification. However, such models often overheat and are not able to work with high accuracy. To solve this problem, it is recommended to use conventional adapters that are installed under the capacitor units. A do-it-yourself metal detector coil is made from a transceiver block.

Application of contactors
Contactors are installed in devices together with control units. Stands for modifications are used of short length, and plates are selected at 20 and 30 cm. Some experts say that devices should be assembled on impulse adapters. In this case, capacitors can be used with low capacitance.
It is also worth noting that after installing the control unit, it is worth soldering a filter that can operate at a voltage of 15 V. In this case, the model will maintain a conductivity of 13 microns. Transceivers are most often used on adapters. Before turning on the metal detector, the level of negative resistance is checked on the contactor. The specified parameter is on average 45 Ohms.