How to make a country hammock with your own hands. Making a hammock at home Do-it-yourself hammock
How sometimes we want to find that shadow that will give us the freshness of the morning or the luxury of the evening for a long time. And we won’t find anywhere better than under a tree! No matter how the sun tries to reach us, we are surrounded by branches, in which it is easy to hide from the summer heat. This is where the hammock comes to mind! An irreplaceable thing! But store-bought ones are either too expensive, too unreliable, and sometimes just inconvenient.
I will try to show and tell everything in detail. You know, looking ahead, I want to say that in fact everything is very easy and simple to do! Available materials, you don’t need a lot of space to make it, and your own hammock is several times cheaper in terms of money, and this despite the fact that we don’t limit the quality of threads and other materials for ourselves.
What we need:
- Durable wooden planks (length – 1 m, width and height – 3 by 2 cm) – 2 pcs. Here I wrote the size of the slats. But you, of course, can adjust it to suit yourself. Just keep in mind that the size of the rope will also be different.
- Rope (cotton cord) – 200m.
- Metal rings (diameter 10cm) – 2 pcs.
How we will do it:
We drill holes (12-14 pieces) in both planks at the same distance from each other. The diameter of the holes should be such that 2 ropes can be passed through them at the same time.

You should not start making holes in the planks without stepping back at least 5cm from the edges. And this must be taken into account! After all, the width of the hammock itself is automatically reduced by 10cm!
We sand the planks and varnish them. This way they will become more reliable and last longer.
A few words about choosing planks. You should not take planks that have a lot of knots. This is unreliable wood and a structure made from it will have low mechanical strength.
Prepare ropes of the required length. Look, the calculation of rope consumption depends on the length of the product. You need to multiply the length by 3. And after that, just cut off the ropes. That is, if our hammock is 2.5 meters long, then we cut off 7.5 m of rope.
How many ropes will we need? Exactly 2 times more than holes! Since 2 ropes are pulled into one hole, we cut off 24-28 pieces.
We stretch 2 ropes into each hole. We extend them at a distance of 70cm. We tie these edges to the ring.

We make strong knots immediately under the bar.
We retreat 7-8 cm and tie the ropes in a checkerboard pattern. And so on every 7-8 cm.

To make the mesh even, and the strength of the structure depends on this, we will use a ruler, a board or any other dense strip of the length we need (from 1 m).

Immediately under the first nodes we lay this plank. And right under it we tie and tighten the knots tightly. Then we move the board lower and tie the remaining ropes in pairs.
IMPORTANT! The last row of knots must match the first! The ropes must be intertwined in the same pairs as immediately below the bar!
And immediately after this series of knots we pull the rope in pairs into the holes of the second plank.
We measure the edges. We trim them so that their length is 70cm.
We tie the edges to the ring.

To tighten the structure, you can pull in denser ropes along the edges and thread them through the edges of the mesh. Stretch these strong ropes and secure them with a knot behind the slats.

Detailed pattern of weaving using macrame technique
In the macrame technique there are a huge number of patterns that can be made from thick cord or even rope. This is what we will use to weave a hammock that is comfortable, durable and beautiful! And yet, you can use a different principle of fastening, not on two strips and rings, but by knitting a “softer” structure, without a fastening base

There is another option - weave thick fabric with a cord using the macrame technique and secure it to the slats.

But we will look at the plank method, only first we weave the fabric of the required size.

Then we attach it to the slats (10cm longer).
- If the dimensions of the fabric are 2.5 by 1 m, then we knit a mesh of 20-30 loops (depending on the thickness of the cord).
- After the first row, in order to knit the next one, you need to turn the fabric inside out each time.
- We calculate the remainder. You need to make sure that the knot is on the edge of the row.
- We thread the loops of the finished fabric into the holes of the wooden plank.
- We collect the cords. At the edges we make a loop according to the size of the ring on which we will hang the hammock from the tree.
- Wrap the loop with a loose cord. Tie tightly under the loop.
- Thread the ring through the loop, although you can also hook it through the loop.

All that remains is to choose a motif and knit the fabric according to this pattern. For example, it could be “Chess” - watch the weaving technique in the video:
Or any of the schemes:

Hanging hammock chair using macrame technique – master class
I'll show you a very simple model. In fact, it is no different from a full-fledged hammock in which you can lie. But there is also a difference - this is how the strips are attached. They are not placed horizontally, but one is fixed above, the second below. Between them there are wooden slats that connect the upper and lower base and allow the structure to be stable.

A few words about the quality of the threads. The fact is that the main emphasis will be on the lower part. Therefore, the threads should not stretch too much; ideally, if it is a thin cable or dense synthetic rope, then the hammock will not stretch quickly.
What else do we need:
- Planks (1.6-2cm) – 2 pcs.;
- Reiki (0.6-1cm) – 2 pcs.;
- Rope for weaving – 125-130m;
- Clothesline for fastening – 4m;
- Screws and drill.
Making crafts.
We make 2 holes on each edge of both planks. One is at a distance of 2, the second is 3.5 cm.
We insert thin slats into those holes that are closer to the edge. And this is how all 4 wooden bases are connected.

We hang a wooden base to make it easier to weave. We cut the rope into 8m lengths (into 16 pieces).
Fold the rope in half. We leave the loop in front of the bar and fold the edges over the bar. We thread the edges into the loop.
This is how we fasten all 16 ropes.

Distribute all loops evenly over the base.
We take the first 4 ropes (from 2 loops) in our hands. We bend the rope on the far right at a right angle, place it on the 2 closest ropes and thread it under the one on the far left.
We pass the left rope behind the two that are nearby and thread it into the loop on the right, which we formed when we bent the right rope.

Lightly tighten the knot. We do this with all the ropes.
To make the second row, step back about 7cm. We skip the last 2 ropes. We take the next 4 ropes in our hands and do the same with them as we did in the previous row: we throw the rightmost one over the leftmost one; We pass the left one into the right loop.

And so the whole series. We weave until we have ends of ropes of about 20 cm.

We tie the edges tightly on the bottom bar.

The chair is ready! All that's left is to hang it up.
We cut the clothesline into 2 halves of 2m each.

We thread the ends of the clothesline into the holes at a distance of 3.5 cm from the edge.
We make strong sea knots at the ends of the ropes.

All! Let's hang up our chair! Simple, fast, and we are guaranteed a wonderful holiday!

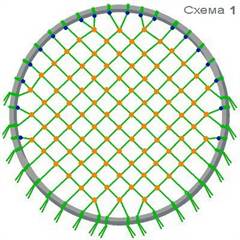
Master class on creating a wicker hammock from a hoop - diagram and dimensions
The main point that I want to draw your attention to is the braiding of the hoop with thread. There are 2 options on how to do this:
- We weave a round base; its diameter should be smaller than the hoop. And then we tie this base to the hoop with a rope.
- We weave directly on the hoop. Let's talk about this option in more detail.

I will describe 2 ways to create a hammock from a hoop.
1 way. We braid 1 hoop and make a hammock swing.

- We wrap the hoop with pipe insulation. It is soft and will not allow you to hit, feel discomfort from touching a metal hoop, or even get injured due to careless movements.
- We tie 2 ropes on opposite sides with a length slightly larger than the diameter of the hoop.
- We intertwine the ropes in the middle of the hoop.
- We also tie the edges on opposite sides.
- And so on until we weave everything in a circle.
- Then we make a “web”. We tie this web with a thin strong rope to the ropes with which it comes into contact.
All that remains is to hang the structure!

Method 2. Differs in weaving. It is a fairly simple, detailed master class in the video.
3 way. From 2 hoops.

In order to braid a hoop with a diameter of 90cm, we need 96m of rope or cord. Let's cut this rope into strips:
- 6m - 8 parts;
- 5.5 m - 4 hours;
- 4.5m – 4h;
- 4m – 2 parts.
How we will do it:

- We tie the longest ones (6m each) on top of the hoop in pairs. How to bind? We have already said: in order to hold the cord tightly and not slip, we fold each part of the rope in half. We put the loop where the middle of the rope is in front of the hoop. We wrap the ends behind the hoop, and then pull them into a loop and tighten them. It turns out 4 rows of 4 ropes.
- And we immediately secure the position with the knot that we talked about in the previous paragraph; this is when the right cord goes behind the left one, and the left one is pulled into the loop on the right.
- We tie the rest along the edges of these long ropes - the closer to the edge, the shorter. We tie it in exactly the same way, in pairs, and only the shortest one is tied on each edge, one at a time.
- The distance between the ropes (or rather, groups of ropes is 6cm).
- The chosen pattern is “Chess”. We talked about it above, and I showed you how to weave it in a video.
Source
In this way, you can braid 2 hoops: one for the seat, the second for the back. Only we don’t knit the back all the way to the bottom. Look at the diagram for connecting two hoops:

- In front, two hoops are tied together.
- From behind - at the same distance from the middle of the back, hoops are tied with ropes of the same length.
That is, the order is:
- We knit the seat completely.
- We are just starting to knit the back.
- We connect the backrest with the seat.
- We knit the rest of the back until it joins the seat. You can trim the extra threads that we did not knit and leave them hanging as a fringe.
- We tie the hammock to a tree branch.

As you can see, everything is quite simple!
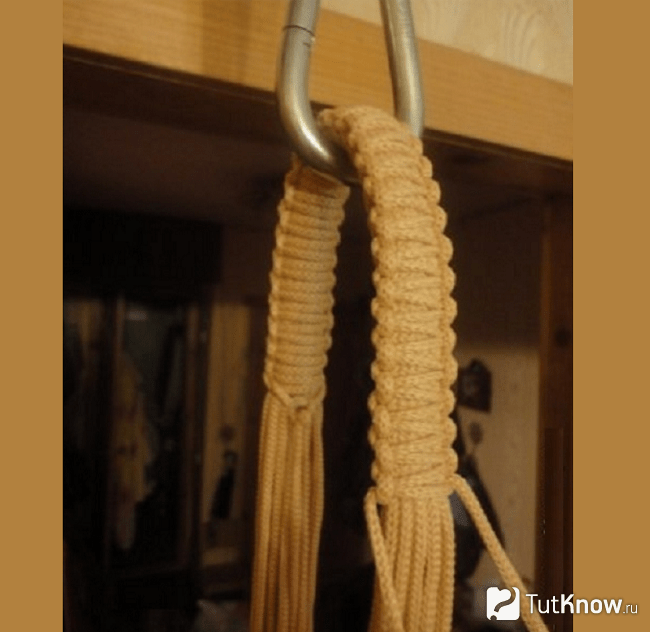
How to make knots for a wicker hammock - detailed instructions and drawing
Today we talked a lot about weaving a hammock. It’s worth finding out which knots allow the hammock to hold tightly and not slip or fall! A well-stretched hammock will allow you to fully relax, and not “lie” in a position where your legs meet your head.
I’ll show you clearly how to attach a hammock, with what knots:
- Bed. If we attach the hammock to the ring.
- Bleached. If the support is thin.
- Retractable bayonet. With a thick support, this type of knot is the most reliable.

And it’s better to show here. I understand this, that's why I picked the video
Sitting comfortably in a comfortable hammock and relaxing in the shade of trees in your summer cottage is a dream for everyone! In order to turn a dream into reality, it is not at all necessary to spend money on a purchase. A hammock is an indispensable place to relax, which is easy to make with your own hands. In this article you will find: weaving a hammock with your own hands, a diagram of the product, its application, history of origin and instructions for making a hammock using the macrame technique.
The macrame weaving style is one of the oldest and most popular types of needlework. What is this process? We can say that this is a technique of weaving various products, which consists of tying knots. Such products were popular not only among poor people, but were popular even on rich estates. Previously, only sailors used a hammock, as it was difficult to rest while sailing. There are many variations of macrame weaving. Weaving a hammock for beginners is easy to do with the diagram and text instructions described below.

Nowadays, diagrams of the macrame knot technique can be made on a laptop and tablet. The method of making things with your own hands is losing its relevance today. But do not forget about the uniqueness and durability of things that you can do yourself at home. Hanging chairs are also made using the hammock principle. The main difference between a chair and a hammock is the size and method of hanging. The hammock is fixed on two supports, and one is enough for the chair.
After studying the master class and learning what to do step by step, you can make incredibly cool crafts. Often, factory-made items are much inferior in quality to products made independently. This requires a minimum of knowledge and a small investment of time, but you can relax while making a beautiful thing. It will fit perfectly into the interior, as it was made specifically for it.


Necessary materials
To work you will need the following tools:
- Strong clothesline (approximately 1 cm thick);
- Ruler;
- Scissors;
- Durable wooden planks (2 pcs.).
To make the hammock not only beautiful, but also durable and reliable, you need to use good wear-resistant material. A thick clothesline or cord is suitable for this.
Unlike rope, cord has a low level of comfort. It will be much more comfortable to sit on a soft rope than on an uncomfortable and hard cord.


Let's look at step-by-step instructions for making a hammock.
Let's get started
First, we cut 20 meters of rope for fasteners. We cut the rest into 6 meters into equal parts. Then we fasten each rope with a loop and a knot on the bar. Next we weave a hammock. The most suitable cell size, so as not to get confused and not fall through in the hammock while relaxing, is seven centimeters. Once you have finished the hammock, attach the ends of the cords with knots to the second plank and to both straps with fasteners.


Hammock Weaving Guide:
- Initially, you need to plan the size of the hammock. For example, its dimensions are 2.5 × 1 m. To do this, you need to knit a mesh, casting from 20 to 30 loops across the width. Remember, the thicker the rope, the fewer loops you need to cast.
- The process of knitting a hammock is reminiscent of making fabric. Knit the first row, turn the product wrong side out and knit the next one. Then turn over again and knit the third row, and continue in this way until the end.

- It is important to correctly calculate the remainder so that the knot is at the edge of the row and not in the middle. Knots can ruin the appearance of the hammock and cause inconvenience during use.
- When the mesh is ready, prepare the wooden planks. Make holes in the bars for fastening.
- Then, in order, you need to thread the loops from each row into the holes.

- Do this with all the holes and loops, attaching the second bar to the future hammock.
- Gather the free ends of the rope together, fold them into a ring shape, wrap them across and tighten. We repeat the same with the other side of the product.
- Thread the holder into the newly formed holes or a tight cord that will secure the hammock to the trees.
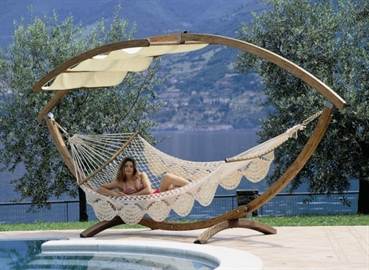
Placing a soft bed especially for yourself on the street or in a cozy corner of the house is an idea that many have dreamed of since childhood. Of all the options, the best solution would be to make a home hammock with your own hands, comparable in comfort to an orthopedic mattress. It was invented by South American Indians, but the technology quickly spread throughout the world.
Thanks to its convenience, a cocoon made of cloth helped both tired gardeners and travelers relax. Let's look at how to make a hammock with your own hands from available materials. Don't worry, your time will definitely pay off.
This is an easy way to relax and keep your hands busy for a few evenings with something useful to do. Thanks to its flexibility, it completely envelops the body, which allows you to maintain it in comfortable balance throughout your rest (Figure 1).
A homemade hammock with your own hands will be an excellent addition to the interior, and a significant reason for pride.
Some compact models require assembly and transportation. Initially, they were a popular product for sailors and travelers, since they made it possible to do without bulky sleeping mattresses. And, moreover, they allowed us to effectively rest in a short period. In the Mexican siesta culture, such sleeping places play a significant role. Having come up with their original method, the Mexicans proved the benefits of two hours of sleep. This efficiency is due to measured swaying above the surface of the earth. Such a hypnotic effect relaxes a person at the psychological and physiological levels.
Figure 1. Options for homemade hammocks
According to the original idea of its creators, this type of bed had a slightly different purpose. Initially, it was assumed that this would get rid of annoying insects in bed. And, in addition, it will help protect the sleeper from snakes.
How to make a hammock at home? The main thing is to be patient. This is a very long and painstaking work. Once you learn how to knit a hammock with your own hands, it will be difficult for you to stop. In this matter, you need consistency and a sewing machine, preferably one suitable for complex stitches. Sewing a hammock with your own hands will not be as difficult as it seems at first glance. It is recommended to read the literature on tying knots. To the question of how to weave a hammock with your own hands, the answer will be short - for macrame lovers it will be easy, but others will have to get used to it.
There are several available ways to make this simple “cocoon”. Of course, you are free to experiment as you wish. The technology is quite simple, and from some perspective it can be applied in new ways. For example, make a hammock chair with your own hands (Figure 2).
What types are there?
- A hiking option made of tarpaulin, rope and its complication with carabiners.
- Lounger made of stitched fabric. It will take some practice and time to make. The advantage is that the design harmoniously supports the body.
- Modification with fabric stitched with cords and wooden slats. The level of comfort is increased due to a more even distribution of weight along parallel threads.
- A more advanced option is the introduction of macrame elements. Partially woven, this type involves long-term work with materials. Efficiency is proportional to the time and effort expended.
- Mesh, based on the macrame principle. A checkered weave similar to a fishing net. For knitting experts, weaving a macrame hammock with your own hands will be relatively simple. Amateurs will have to spend a couple of evenings.
- Double beds. These beds will help a tired couple relax. The technique of their manufacture is a complicated version of the usual Mexican model with a parting in the middle.
- Frame. The frame makes it easier to attach the bed, because unfolds manually in a few minutes. You can even make a metal hammock with your own hands. The frame mounting frame is made of metal elements, while the main part is made of durable, stitched tarpaulin.
- A DIY hammock chair will be an excellent addition to your interior. The product involves covering it with fabric around a metal ring. It is convenient to read a book or, relax, work on a laptop. The stretched fabric supports your back well and you don't have to worry about your posture.
 Figure 2. Main types of suspended structures for recreation
 How to make a hammock with your own hands: step-by-step instructions
The main problem in making such a sleeping place is the apparent complexity of the design. In fact, this is quite simple, but nevertheless painstaking work (Figure 3).
In order to sew a hammock with your own hands, you will first need to select the installation location. For example, it can be mounted on a hanging frame or a pair of pegs.
The DIY fabric hammock design does not include sides or edges. Therefore, the garden lounger should not be placed overhead, windy soil or hard, rocky ground. It is recommended to install the sleeping area above the lawn.
So, how to make a hammock with your own hands:
- Calculate your measurements: you need to add 40 cm to your height. The width of the canvas should be approximately 9 meters.
- Seal the edges by folding them into an accordion shape.
- Now, squeezing the end evenly, make one solid loop out of it.
- Without tying the loop, thread the twine through it.
- Wrap it around the loop once, passing it under itself.
- Repeat this step, then tighten tightly.
- Do the same operation with the other end.
- Wrap the tree with string. Form a loop on one side to thread part of the cable through.
- Make a loop from the threaded part and pass the end wrapped around the tree into it, folding it in half.
- Pull the loop tighter.
 Figure 3. Step-by-step manufacturing instructions
 The mounts can be equipped with carabiners, making them easier to use. Thread a small piece of cable into the carabiner and pull it through the loop. The principle of tying a knot does not change; treat the two ends as one solid string. The final node for attaching to the tree will be partially modified. To form a ring, tie a knot by wrapping the cable several times around the base, and then thread the end through the top loop. For more complex structures, for example, rack and pinion, you need to act a little differently.
You can create such a hanging hammock with your own hands as follows. Prepare the rail in advance; you will need two of them in total. Make holes at equal distances for the fastening cables, 2 cm in diameter. Thread the laces in pairs through the holes, intertwining them with neighbors. At the final stage, intertwine all the ends, tying them into one loop.
Selection of material and tools
When choosing materials, keep in mind that they must meet criteria such as strength, tensile strength and durability (Figure 4). Check the available components in advance; it may be better to purchase new ones, because they must withstand the weight of the sleeper, adjusted for restless sleep.
Let's look at what and how to make a home hammock:
- Multilayer, dense, polyethylene fabric: will support your weight and will not stretch for a long period. However, it has terrible ventilation properties and will be unpleasant to the touch.
- Tarpaulin: Quite a harsh decision. Does not have outstanding benefits and is not suitable for daily use.
- Paracord: a good choice for weaving exercises. Does not stretch and maintains excellent strength. High tensile strength, temperature resistance.
- Synthetics: copes well with your weight, distributing it evenly. Highly flammable.
 Figure 4. The most popular types of materials for manufacturing
 How to make your home hammock more attractive? Select materials in accordance with the color scheme of the environment. Practice macrame and tie beautiful fastening knots. If it's a knitted lounger, weave the threads in an interesting pattern.
Drawings and sizes of hammocks
The fabric used for stitching should be of the following sizes:
- Width: from a meter to 90 cm. If you want to do stitching, then double this value, since the canvas must be folded in half.
- Canvas length: should always be 0.8-1 m greater than your height. The optimal value is 2 m 80 cm.
To create a hammock with your own hands, weaving, dimensions and frame will play the main role:
- The fastening straps must be the same length.
- The recommended cord diameter is from 8 mm.
- Use only tensile ropes.
A drawing of a hanging hammock with your own hands will look like this:
- You will need a fairly wide canvas.
- Using two strong strips, make traverses from them by drilling holes at equal distances.
- Fold the fabric in half and sew special channels for the belts on it. They need to be done at an equal distance, using a double seam along the edges of the channel. Reinforce the exits with eyelets.
- The ends are woven into a thick knot and attached to the suspension.
Making a stand requires some carpentry skills:
- You will need 7-8 beams 10x10 cm.
- For convenience, the total length of the frame is taken as 3 m.
- The legs are installed near the outgoing horns of the supports.
- The supports themselves are secured with safety bars from the outside. The angle between them and the base should be 90 degrees.
- The angle of connection with the supports is 45 degrees.
- Thick hooks, bolts or other methods of fastening in wood are suitable as fastenings for the sun lounger. Requirements – must withstand from 35 to 40 kg.
 Figure 5. Drawings of a rectangular and round hammock
 In Figure 5 you can see ready-made drawings of a classic and round hammock.
How to weave a rope hammock with your own hands
This interesting model was invented in Asia, where fishing was part of the culture. They were made using disused fishing nets, hence the shape. Their advantage over regular ones is the duration of sleep. Thanks to ventilation and a more harmonious distribution of weight across the traverses, you can sleep on them much longer (Figure 6).
 Figure 6. Rope weaving technique
 How to weave a hammock from a rope with your own hands:
- Calculate the required rope length. Count the number of holes in the slats, then multiply that by the length between the two crossmembers. For example, a product 2.5 m long and 0.9 m wide will require a total of 170 meters of rope, with only 20 for fastenings.
- Weaving the pattern is possible in many ways. Braiding and a square knot look quite attractive.
- Intertwine the fastening cords together, properly distributing the weight.
- Thread their ends into the holes on the traverses and connect them into one knot.
It will be easy to weave a hammock for a child with your own hands using these instructions. This will take a little less rope, and the total length of the product will be somewhere from 1.5 m to 1.8 m. The weaving mechanism remains the same.
The selection of the mounting location should be approached responsibly. To begin with, it should support half your weight with an extra ten kilograms (Figure 7).
For example, a reliable option would be two logs 15-20 cm thick, dug 1 m into the ground. It is also possible to drive pegs into the stones, but do this carefully if the rock crumbles.
 Figure 7. Technology for hanging a structure
 If you plan to place the lounger in the house, it is better to attach it to a special patch mounted on strong bolts. Securing sitting hammocks with your own hands is not difficult. They use only one fulcrum point, which must also support your entire weight. This could be a thick tree branch or a steel beam. For fastening, a figure-of-eight tie is usually used.
How to make a hammock for animals
Perhaps you want to practice knitting on small sizes and then move on to more complex designs, or add more comfort to your pet's life. A handmade lounger is perfect for all this. The main thing is to then teach your pet to sleep in it, because for some animals this may seem like a wild innovation. Let's look at how to make a hammock with your own hands for pets.
For a cat
This fluffy bundle of tenderness requires comfort at any time of the year. A happily sleeping cat quickly improves the atmosphere at home. And, quite possibly, it will add several photos to your collection (Figure 8).
How to make a hammock for a cat with your own hands?
- A one-piece fabric model is best. The animal may become entangled in the tangle of threads.
- Sew the edges, first threading the rope there. Use a longer rope for the sides and a shorter rope for the smaller sides.
- In total you will need four twines, but of different lengths. Take as a basis from 80 cm to 1 m in length. The length of the side ropes should be twice this.
- The smaller ropes, after passing through the traverse, are threaded into the control bar.
 Figure 8. Design options for a cat
 Unfortunately, an animal will not always appreciate a hammock made by itself: it may not like the weaving, size and model. Be prepared to repeat the experience.
For the rat
To carry out such a modification, the cage must be spacious. How to make a hammock for a rat with your own hands? A hanging model with one rail for attaching both ends at one point is perfect here (Figure 9).
Make sure your pet can get into it freely:
- Focus on the canvas size of 30-40 cm.
- Sew the fabric with rope moves, secure the ends to the rings.
- Attach the ring to the traverse at both ends, then secure it to the ceiling of the cage.
 Figure 9. Technology for manufacturing a hanging structure for a rat
 You can also try making a Mexican-style lounger. It is not recommended to make a knitted one, because the rat will simply dine on it.
For chinchilla
A larger and more restless representative of rodents. However, she loves comfort, which can ideally be provided with a handmade sleeping place (Figure 10).
 Figure 10. Types of hammocks for chinchillas
 How to make a hammock for a chinchilla with your own hands?
- A Brazilian product is perfect for this animal.
- On a rectangular piece of fabric (dimensions - 100-110cm), select the rightmost and leftmost corners.
- Attach adjacent corners to them. Tie tightly into a loop.
- Secure the resulting product in any convenient way.
For the pig
The guinea pig is a wonderful, playful animal. And he loves comfort just like all other rodents (Figure 11). Have you ever thought about how to make a hammock for a pig with your own hands?
The animal's cage should not be too narrow or low for this:
- Make two small slats with holes at equal distances.
- Focus on the average lace length of 20 meters. Paracord is ideal.
- Weave in a narrow knot, leaving as little free space between sections as possible.
- Cover the weave with soft fabric.
- Secure.
 Figure 11. A hammock is a great place for a guinea pig to rest.
 Knowing how to make a hammock at home will help you not only decorate your garden or bedroom, but also make your trip easier. Good luck!
You still don’t know how to make a hanging hammock chair for your home or cottage? Such a resting place can be made from threads, planks, fabric and a gymnastics hoop.
How to make a hanging chair with your own hands from fabric?

Such relaxation swings can be made from various materials, from:
- fabrics;
- threads;
- planks;
- vines;
- plastic;
- rattan

The second type of these swings for relaxation is a cocoon chair, it is wicker and has a rigid frame.

A chair with a soft base is similar to a hammock, but differs in that the hammock needs to be hung on two sides, while this chair only needs to be hung on one.

There are several methods that can be adopted to make this recreational item at home. The basis of such chairs is a regular hula hoop.

To do this, use:
- gymnastic metal hoop, diameter 93 cm;
- padding polyester;
- dense linen fabric, for example, jeans - 3 m with a width of 150 cm;
- cotton fabric - 40 cm;
- belt tape - 8 m;
- trouser braid - 3 m;
- four metal buckles;
- reliable metal ring.
To make even blanks, fold the squares of fabric in half twice, draw a quarter circle, and cut out.

On one side of one of the circles, draw a rectangle, as in the diagram. Make a cut in the center of this figure, not reaching the end of the rectangle, cut to the right and left at an angle of 45°. This is where the straps will be attached.
Make exactly the same slot on the second circle. To reinforce these areas, stitch here with trouser tape.

Notch the edges of both sheets, cutting out in the form of cloves.

Cut the padding polyester into strips, place them along the edge of the round parts, and later the hoop will be located here. Fold the circles of fabric with the wrong sides facing each other, inserting strips of padding polyester inside along the edge. Sew, retreating from the outer circle to the inner one 6 cm.
Insert the hoop, fold the edges of the fabric, and stitch them outside. Cut the belt tape into strips 2 meters long.
To prevent the ends of the belt from fraying and unraveling, they must be melted over a flame.
Place buckles on these blanks and use them to adjust the angle of inclination and height of the product.

As a result, you will get a comfortable hanging chair, which can be created from available materials. The second option also involves the use of fabric.

To make such a hanging swing, take:
- nylon threads;
- carbine;
- hook;
- dense fabric.

From the same fabric you need to cut strips measuring 7.5x15 cm, you will need 14 pieces. Fold each in half and stitch along the edge on the wrong side to create a ribbon measuring 15 x 3.8 cm.
Now fold these blanks in half lengthwise, firmly stitch the ends with a cross and along the perimeter. You have a folded loop of 7.5 x 3.8 cm.

Now you need to sew 7 such parts on one side and the same number on the other side of the main fabric.

Through each such loop, pass a neon rope folded in half. Tie to secure these threads.
Fold the edge of the fabric twice, insert loops here, sew, making three parallel seams to secure the workpieces well.

Look at how the ropes need to be secured to securely fasten them.

Tie the upper edges of the ribbons with knots onto a strong wooden stick. Secure the structure with a carabiner, then hang it on a reliable ceiling mount.

A hanging hammock chair will be very comfortable to use when you sew two pillows for it - for the seat and the back.

You can do it quickly. To do this, you also cut out a rectangle from thick fabric; you need to tuck it on the right and left sides in order to thread a strong rope into the resulting drawstring.

It will be enough to put a low pillow here, and the place to rest is ready. It is best to hang such fabric chairs using a wooden plank. You need to drill 4 holes in it along the edges, insert the edges of the ropes and the central thread here. All this is fixed with strong knots.

Chains can be used instead of ropes. To do this, holes are made along the edges of the hammock chair, where metal rings are attached. Using carabiners, the chain is fixed in these holes and at the top.

There are designs made from other materials, check them out.
Hanging hammock chair made of wood

It’s nice to relax on such a chair in the countryside in the fresh air. It can be made from Euro pallets, thereby solving the problem of their disposal and getting the right thing almost for free.
To make such a hanging hammock, take:
- boards measuring 600 by 120 mm or 700 by 150 mm (the thickness of these boards is 10–15 mm);
- varnish or stain;
- 10 meters of nylon paracord cord;
- drill and bit;
- sandpaper;
- jigsaw or hacksaw.
Sand each board to ensure there are no splinters left on the surface. Treat these blanks with stain or varnish intended for outdoor use.
Drill holes at the edges of each board at a distance of 5 cm, place the two pieces side by side, weave the cord first diagonally in one direction, then in the other to connect the boards.

In the same way, tying the laces crosswise, connect the other elements of the hammock.
The ropes do not need to be tightened too tightly so as not to deform the structure. The hammock elements should not overlap each other.
Drill holes in the top board and the second one from the bottom. This is where you will thread a strong rope to hang the hammock from a frame made of four planks. That, in turn, needs to be attached to a rope that is attached to a tree or, for example, to the ceiling of the veranda.

You can make a similar hanging hammock chair from wood in another way.

To make such a swing, take:
- wooden planks of suitable size, 1.5–2 cm thick;
- self-tapping screws with wide heads;
- durable nylon cord.
On the wrong side, connect both ends of this cord and secure them with a self-tapping screw. Braid the boards on the other side in the same way.
Attach a cord to each plank on the reverse side using a self-tapping screw. Tie a rope from the bottom and top of the chair on one side and the other, align the slings, and hang your product. We need to dwell on this issue in more detail, since the hanging chair must be securely attached to the ceiling.
Methods for attaching a hanging hammock chair
If you want to hang a chair at home, you need to choose fasteners based on your specific ceiling. If you have a solid concrete ceiling without voids, then to implement your plan you will need:
- powerful anchor;
- metal chain;
- hook;
- drill or hammer drill;
- drill for concrete.
You can buy such parts individually or a set, which is a kit designed for attaching hanging devices.

If there are voids in the ceiling slab, then you must first make holes in it, then fill it with a special compound called a chemical anchor.

A metal anchor is inserted into the filled hole in the desired position. It is necessary to leave it for 2-3 days so that the soft composition completely hardens, only then can you hang the hammock chair.
If the ceiling is reinforced with strong floor beams, a special mount for hanging chairs will hold well on it. As you can see, it is fixed with bolts.

The following design is suitable for suspended ceilings. The upper part is mounted on a solid concrete ceiling, then it passes through the suspended ceiling. A hook or ring with a decorative cuff is screwed into this, and a hanging hammock chair is attached to the device.

Reliable slings can be made from linen or jute rope. You can perfectly secure several ropes using macrame.
This uses a double flat knot. It is created by alternating weaving a left and right flat knot.

How to weave a hanging hammock chair with your own hands?

This is one of the simple options. For such a hanging chair, take:
- four wooden or plastic strips;
- rope rope;
- drill;
- threads
On the top bar, collect the required number of threads, bending each in half. Create a canvas using . Here a “checkerboard” pattern of flat knots was used. If it’s still difficult for you to master macrame, then sew a rectangle from reliable fabric, tuck its edges at the top and bottom, stitch with a margin to insert reliable strips here.
If you want to weave a hanging chair using macrame, then at the end of the work, tie the threads to the bar, tie them with knots, cut them, leaving the fringe.
All that remains is to thread the rope slings through the holes made in the transverse slats, after which you can hang the hammock from the ceiling or from a tree.
The second option is more complex, but no less interesting in execution.

Before weaving a hammock, you need to prepare:
- large gymnastic hoop made of steel;
- two small gymnastic rings with a diameter of 17 cm;
- polyester cord with a diameter of 0.5 cm;
- hook;
- scissors.

To make a seat, use a hook to crochet a large openwork napkin of a suitable diameter. To do this, first cast on 10 air loops and connect them into a ring.
- Complete the first row according to the pattern: double crochet, chain 1, then in the same way.
- The second row consists of a double crochet and two chain stitches, also knit to the end of this row.
- In the third row you need to alternate double crochet and 5 chain stitches.
- In the next rows, add two air loops in each.

In the last row you will need to braid a hoop to create a seat for the hammock chair. If you don’t want or don’t know how to crochet, then you can make it using this braid.

To do this, you need to act in a similar way when darning items. First, tie the threads to the hoop horizontally parallel to each other, then vertically, passing them between the ones you just created in a checkerboard pattern.
If you are interested in the macrame technique, using simple knots you will make a woven mesh for the seat.

To create this you will need:
- 2 threads 400 cm long;
- 4 threads of 450 cm;
- 4 pieces of threads 550 cm each;
- 8 threads of 600 cm.

Now make two flat corners on each to secure these elements.

Tie the remaining threads on the right and left sides of these central blanks. First, to the left and to the right of them are two, each having a length of 550 cm; then 2 x 450 cm; after that, one at a time, 400 cm long.

Starting from the center, weave a checkerboard pattern, leaving equal distance between the knots. In this way, fill the entire gymnastic hoop.

See how you need to pull the threads at a 45 degree angle to get a similar effect.

Now you can make a suspension for the chair. It will be delicate and beautiful, but creating something like this requires patience.
First of all, cut 20 ropes, each 10 m long. Tie them in the center with a knot to mark the middle. Make 12 flat knots on these blanks.

Turn the work over and make 15 more flat knots. This part will be the loop.

For the convenience of weaving a hammock chair, move this piece upstairs, hanging it on a carabiner or on a belt.
Make a loop from this ribbon by making 4 flat knots.

You need to weave a so-called bell. To do this, turn the work sideways towards you, make a row of flat knots, stepping back 4 cm from the last row of weaving.

The first row of this bell will consist of 10 knots. To create a second one, you need to retreat another 4 cm from this first one. Make 10 knots in a checkerboard pattern relative to this one. Before making the third, step back a little lower by 5 cm.

Now you need to braid a small gymnastic leather hoop with threads.

Tie 4 threads in the center of the hoop, and 2 along its edges.
Attach the hoop with threads and begin weaving the back. To make it gradually expand, start tying the side threads; you will need about 20 pieces.

Continue creating the backrest for the hammock chair. You can use the pattern provided or your own weaving.

Along the edge of the design, make two rows of flat knots or one row of rep knots. When the back is completed, tie it to the hoop first in the middle, and then, pulling evenly, attach the side threads.

This is a wonderful hammock chair or something similar you can make.
When relaxing in the summer, it would be great to lie in a hammock, sipping a cold drink. Did you know that a hammock is not too difficult to make with your own hands? You just need to follow the instructions provided. It has been scientifically proven that 2 hours of sleep on a hammock restores the body in a way that a night's sleep on a bed cannot. A hammock also helps you relax and relieve stress.
Sleeping in the air was invented by the South American Indians, who, in fact, invented the hammock. Since then, the hammock has undergone many improvements, becoming quite versatile. You can sleep in it, it relieves back pain, and the gentle rocking calms the nerves and relieves stress.
History of the hammock
South American tribes came up with a way to relax in the air. Unknown to anyone, but such inventive people have introduced many things into the life of modern man that have been considered absolutely familiar for several hundred years. So, they came up with something like modern basketball and a ball. The Mayan tribes called this sport “pok-ta-pok,” which was associated with the movement of cosmic bodies in outer space. The ball was made from latex material and a liquid extracted from rubber vegetation over the course of about half an hour! The liquid was mixed, and after about fifteen minutes, when it took on the appearance of a thick consistency, a ball was molded from it.
Canoes and scuba gear, snowshoes and moccasins, thermoses, chewing gum, salted popcorn and chocolate, a syringe and camouflage-themed clothing... South American tribes showed the whole world how to drink coffee drinks, grow potatoes, tomatoes, peppers, tobacco, peanuts, corn , sunflowers, vanilla plant, and world-famous ceramics, weaving, and jewelry are currently valued at quite large sums. And this is not the entire list of their inventions.
The hammock is another useful Indian invention that appeared almost a thousand years ago. They created unique sleeping places using the bark of trees called "hammock", which became the basis for the modern name "hammock". The Indians believed that this miracle bed was excellent for combating dampness at night and annoying midges, in addition, it was easy to transport. Over time, the unknown device spread across Central and South America and took root in the life of tribes, becoming an integral element of everyday life. The ancient inhabitants of America almost spent their lives in hammocks, so the list of materials was replenished quite quickly: hammocks appeared, woven with strong cotton rope and sleeping places made of solid fabric.
In addition to the South American tribe, hammocks were also approved by the original emigrants from the Old World and sailors: the hammock did not take up much space and allowed you to sleep comfortably during hikes. As a result, the miracle bed arose in European countries as exotic souvenirs and decorative elements that were used for short sleep. Columbus, returning to Europe from the “New World,” took with him a couple of hammocks.
Today, a hammock is not just a decorative element, but also one of the mandatory attributes of the summer season. These miracle beds are found almost everywhere, both in gardens and at home. No other semblance of a hanging resting place can so relax the muscles of the back, shoulder girdle and neck. Summer residents especially know this, as they can lie down for a minute, restoring the balance of power.
You can buy this invention of the ancient Mayans in almost all construction supermarkets, but it is much more pleasant to relax in a hammock made with your own hands!
Moreover, production does not take much time and does not require specific skills. The only thing you need: a couple of hours of free time, the necessary material, minimal knowledge of sewing, and as a result, your evenings can be spent comfortably sitting with your favorite book in a hammock.
Such a “bed” can be made at home using traditional weaving, fabric, wood, adding slats or special bright decoration, and you can also choose any color and material you like. So, here are step-by-step instructions on how to make your perfect hammock that will delight you for many summer seasons.
In urban conditions, with a severe shortage of living space, a hammock is actively used as an additional sleeping place. On dacha it can replace traditional cradle.
Types of hammocks
Hammocks are:
- hanging - the classic, simplest look. There may be some variations (fastening, presence/absence of strips, material of manufacture), but in general this is the most affordable option;
- frame hammock - there is no need to decide what to actually attach the hammock to. Usually the frame is a prefabricated structure, so such a hammock can be easily transported and installed in the required place, and in winter - in apartment;

Depending on the type of hammock that will delight you during your summer holiday, you can choose your step-by-step instructions, which are presented below. But first, you should familiarize yourself with the general recommendations, which will definitely not be superfluous.
- Reliable support. To protect your own rest, the bed must be suspended between a pair of trees or pre-prepared pillars. In order not to fall to the ground in a dream, it is recommended to take metal pillars with a cross-section of at least 86 millimeters, dig them to a depth of 80 centimeters and concrete them. You can protect your own suspended resting place from the interference of your own and familiar children, and adult gardeners can lie down in a hammock when their backs ache after weeding the garden and carrying buckets.
- Hang the hammock at a height of 1-1.5 m above the ground. To calculate the distance between the posts, it is necessary to take into account the length of the fabric and thirty centimeters of deflection. If 2 trees with a diameter of at least twenty centimeters are used as a support, then the length of the future sleeping place is adjusted. The higher the hammock is tied, the deeper the deflection , and it is necessary to tighten or loosen the fabric depending on the placement of the supports.
- As fastenings Take a reliable synthetic rope with a diameter of at least 8-10 millimeters. If necessary, the canvas is secured with eyelets for greater reliability.
- Canvas For your future vacation spot, it is recommended to choose from natural materials - teak mattress, camouflage, tarpaulin. Synthetic materials, of course, are light, durable and cheap, but the body does not breathe, sweats, and, ultimately, discomfort occurs, while natural fabric is able to quickly take on the shape of the body.
- If you have chosen wicker hammock, it is necessary to use cotton cords, since they are easily tightened, and the knots are more pleasant to the touch than with ordinary nylon threads. Places where the rope may fray in the future must be protected with polyethylene tubes.

DIY hammock
The simplest type of hammock that you can make yourself is the Mexican one, which resembles a cocoon that completely envelops a person. It is almost impossible to fall out of such a hammock. And to make it you will need a piece of strong (to withstand the weight of a person) fabric and a pair of strong ropes. Another option is to weave a hammock from ropes (not synthetic ones), for this, basic macrame skills are enough. For a standard (2.5 meters) length you will need about 150 m of rope (cotton cord).
Now let's look at the detailed instructions and necessary components for the hammock of your dreams.
DIY Mexican hammock
Such a hammock is made without using crossbars, using only pieces of strong, most often solid material. A kind of cocoon envelops the entire human body, allowing the owner to relax every centimeter of the body. It is difficult to fall out of a Mexican hammock. But it is not easy to climb into it, so this type of place for summer recreation is not used, as a rule, by elderly or sick people. If you do not consider yourself to be in this category, then feel free to choose this model, because such a hammock simply folds into a bag or a backpack, and its weight category is small. This miracle bed can be tied to any tree trunk, like a real Indian hunter.
To make a Mexican hammock from solid fabric, take two pieces of fabric one and a half meters wide and three meters long. The cut edges must be folded and stitched in all places. Next, you should follow the instructions provided below.
- Sew two meters along the long sides (green stripe).
- Those marked in yellow cannot be stitched, since it is thanks to these holes that softer fabric is placed inside for greater comfort.
- The red lines are the edges that need to be turned in two to three centimeters and stitched on a typewriter.
- It is necessary to thread a pre-prepared rope into the “tunnel” that appears.
- The ends of the rope placed inside are crossed and tightened until the fabric begins to gather into a knot.
- We wrap the ends of the rope twice around the tightening point and tie it with a knot.
- Tie the tree with a hanging rope a couple of times, adjusting the canvas or putting a tube on the rope. This will help protect both the tree and the rope itself. The suspension rope is attached to a knot that secures the hammock fabric using a “noose” knot.
- Stick to the ratio of the diameter of the hole to the cord (one to three), which allows you to more tightly fix the laundry cord folded 3 times.
- The length of the rope is chosen depending on the pattern you like. The length is calculated approximately like this: the gap between the slats is increased by 3 times, and then multiplied by the number of holes in the slats.
To weave an openwork hammock measuring 2.5 x 0.9 meters, you need to take 150 m of cord for the pattern and 20 meters for attaching the hammock to the supporting part.
- Cut twenty meters for fastening sections, the remaining part of the rope is cut into equal parts of six meters.
- The ropes are secured using loops and knots on a wooden plank.
- The optimal size of a patterned fragment is considered to be 7 centimeters, so you will relax without fear of falling through or getting tangled in the hammock.
Check the resulting product for strength, adjust the degree of tension and you can safely test the hammock!