Installing a handle on an interior door. How to remove and disassemble the door handle of an interior door. Remove the handle of an interior door without bolts.
It is useful for every home owner to know how to disassemble a door handle on an interior door, because often these devices break, and it is impossible to open the door or repair the handle without opening and disassembling it.
This is not difficult to do, but before starting work it is better to know exactly how to do this, otherwise there is a chance that the handle will finally become unusable.
In the article we will analyze the classifications of door devices, as well as the way in which they can be disassembled.
The video will help you repeat this process if the hardware on your interior door has become unusable.
Despite the fact that door handle options are presented in a wide variety on the Russian market, any handle can be classified into one of three types based on its design.
The first type is stationary. They do not have a lock and are attached to the door with screws. Such handles come in a variety of geometric shapes, which are possible due to the absence of a lock.
Sometimes these models are equipped with roller locks, which are needed to keep the doors closed. Most often, such handles are placed on glass doors or those with an aluminum frame.

The next type is push-type. They differ in that during production a special latch is built into the end of their body, connected to a spring, which keeps the door closed and prevents it from opening.
If you press the device, the latch goes inside the body and allows the doors to open.
Such models are very popular among consumers and can be used for both interior and exterior doors.
These types of fittings are divided into two types: the first are equipped with a mechanism with a pallet lining, which is mounted through the lock, and the fittings themselves are mounted on an axial rod, which is selected in exact accordance with the size of the door leaf.
If the rod in this device becomes unusable, then all the fittings have to be changed, because replacement of other parts becomes impossible.
Devices with separate escutcheons, unlike the former, may be without a lock, their design is somewhat simpler, and their operation depends only on the size of the key hole and the escutcheons that are installed in the device.
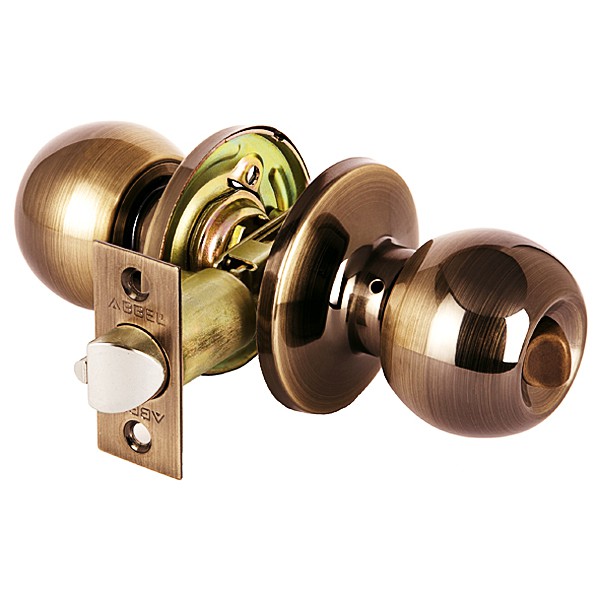
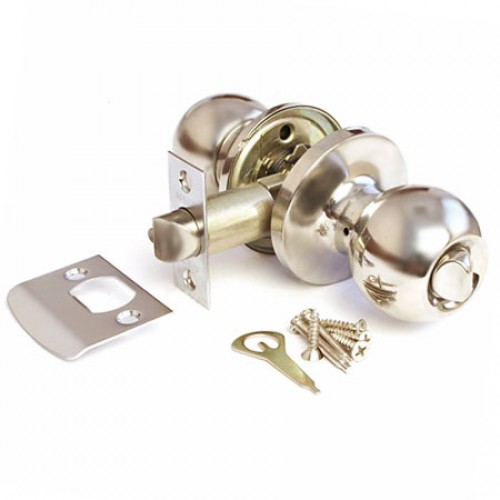
Knob handles - the next type - are always equipped with locks, and they are varied in shape, they can be either in the shape of a ball or in the shape of a lever. A keyhole is cut into the center of such a handle.
After the key is inserted into the handle, it activates a special lever (button or latch), which makes it possible to open the door.
This model is in demand among consumers, and most often such handles can be found on the doors of bathrooms and toilets, but they are also often installed on interior doors.
Before you start working with door devices, prepare some tools:
- a flat or Phillips screwdriver (its choice depends on the screws that are installed in it);
- a key equipped with a stop for operations on assembling and disassembling fittings (if this is not available, then you can use a regular awl);
- adjustable wrench;
- pliers.
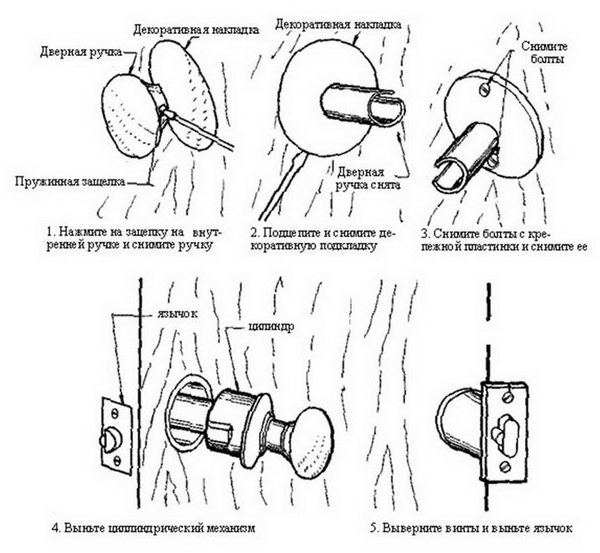
How to disassemble the fittings?
If the fittings are already attached to the door, then before you take it apart, you must first disconnect it from the surface, regardless of what type it is.
To do this, you will have to remove the cover on top from the handle. It is located in the place where the lever or button for locking is located.
You can remove the trim using a key or an awl; to do this, you need to press the rotary lock stopper, which is located inside the fittings. After these steps, it will be easy to separate the handle and the latch axis from the body - just pull it.
Once the parts are removed, you need to unscrew the screws that hold the handle in place using a screwdriver (usually there are two). When this is done, the hardware, divided into two halves, should move completely away from the door.
Sometimes you can disassemble the handle without disassembling it into two parts, for example, if the door was reinstalled in another place.
Let's take a closer look at how handles of different models are disassembled.
It is easiest to unscrew a stationary door handle - it is attached to the door with screws, which need to be unscrewed to remove the fittings.
Such handles break very rarely due to their simple design, so it is usually necessary to remove it only in cases where you want to change the model to a more modern or functional one.
To remove it, unscrew the retaining screws using a flathead screwdriver and then remove the handles from the door.
If it is installed on an axial rod, then in this case you first need to remove one of the retaining fragments, after which the second part will come off on its own.
You can check whether the device is installed on the rod as follows: with one hand you need to hold the handle, and with the other try to turn it.

Push-type handles are more complex in design, and therefore take a little more time to disassemble. All work takes place in three stages. First of all, you need to remove the screws holding the trim.
Then remove the holding tetrahedral rod - after it is separated, the fittings will be easy to unscrew. The third step is to remove the second overlay and remove the remaining fragment and the axial rod.
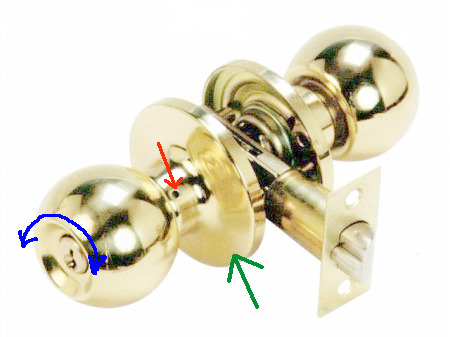
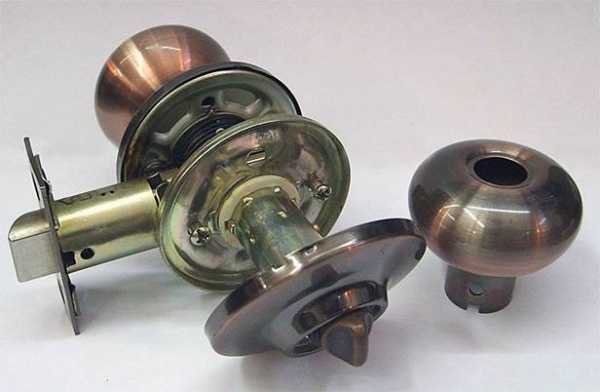
Round door fittings with a lock will take longer to disassemble than others, and their design is more complex, but such models can be installed not only on interior doors, but also on entrance doors.
The first step is to remove the flat trim that surrounds the handle. Then, using the key, press the stopper, which was hidden under the trim, and pull the handle towards you.
Instead of a key, you can use any suitable thin, sharp object. Once you pull the handle, it will move away from the door and reveal the screws holding the latch in place - these also need to be removed.
If the round handle does not need to be removed, but only rearranged, then you need to proceed as follows: you need to insert a latch into the door, and the beveled side of the tongue should be adjacent to the closed door leaf.
After the parts are installed, they need to be secured with screws. Then place the remaining piece of hardware, containing the key mechanism, on the part of the door you chose.
The clamping part must be placed on the reverse side and secured with two screws.
Once everything is installed, check that the door handle turns freely and returns to its original position without any obstruction.
You can move it to the side a little and straighten it if necessary. When it is fixed in the desired position, secure the decorative strip on top and insert the last piece into the clamping part of the fittings.
The fitting lock must be rotated so that its slot is in the same position as the square rod with the plate, because it should fit smoothly and smoothly into the handle.
The last step is to put on the device itself, it should reach a stop, after which it needs to be recessed a little, to do this, press across the axis of the pressing part of the fittings.
The removable part of the device must be pushed all the way so that it reaches the clamping structure.
Now you can put on the decorative strip, first checking that it matches the groove.
Check again how well the fittings are fixed and whether they rotate freely and return to their original place - to do this, turn them all the way on each side (on the one where the latch is, and on the one where the drum latch mechanism is located).
Disassembling round fittings with a lock is the most difficult, but the instructions and video will help you with this - having completed the process once, in the future you will be able to easily repair door handles quickly and without much effort.
It will be useful for any owner to know how to disassemble the handle on a door, especially an interior one. This fittings are subjected to serious testing by all residents, so someday it will fail and another one will need to be replaced. In this case, you do not need to call specialists; you can handle it yourself, while saving on employee wages. Moreover, this business does not require great skill, but only a little skill. The dismantling process may differ depending on the type of handle, but the entire process should not cause any particular difficulties.
How to remove the handle from an interior door? Before you begin to analyze the mechanism, you need to find out what type of classification it belongs to. The division occurs according to several criteria. The one described below is suitable specifically for analyzing the handle, because it has a classification according to design features.
Types of pens
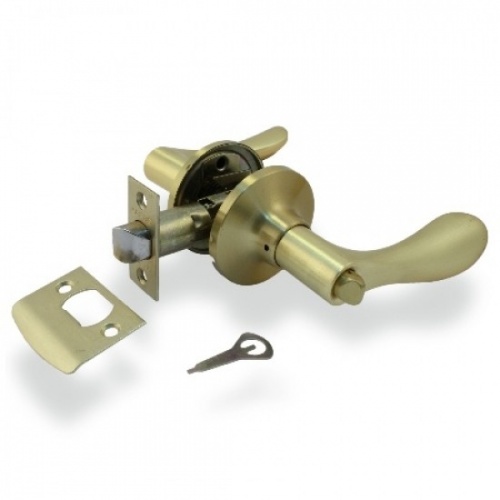
Push. This handle is attached to both sides of the door leaf and has an L-shape. Opening occurs due to the load on the handle, after which the tongue is set in motion. The disadvantage of this fitting is that it is very dangerous.
Rotary. The opening method is the same as that of a push button, only the tongue is driven not by pressing the handle, but by turning it. Such models are often not very convenient, because in order to scroll it, your hands need to be dry, otherwise they will slip. When replacing them, a reasonable question arises about how to unscrew the interior door handle.
Stationary. This handle does not have a latch. It is attached with self-tapping screws directly to the door leaf. It can be single- or double-sided, and has an axial connecting element.
Reasons for disassembling the pen
It is not so difficult to disassemble any of the door handle models, because they have a similar design.

At the same time, it is extremely rare to disassemble this hardware. What reasons can lead to this? How to remove the handle from an interior door?
The first reason is breakdown. It occurs most often. Inexpensive Chinese models, which are not designed for constant and rough loads, are often prone to breakdowns. If the prevention of certain elements is not observed, the fittings become unusable. It should be repaired, and sometimes the entire element should be replaced.
The next reason is the need for replacement. Every year the market is replenished with new and improved models. In this case, you can choose a color scheme that matches the interior, or install a new, more functional and reliable model.

Indoor renovation often means a change in style. Door handles are also not ignored. Therefore, the question often arises of how to disassemble a door handle.
Another reason is the spoiled appearance. If a part is made of low-quality material, then scuffs and scratches will very soon be visible on it, which negatively affects the entire interior.
Removing the push handle
How to remove the handle from a push-type interior door? This mechanism is more difficult to disassemble, because in its design there is an axis rod, due to which the handle is held. It is tightened with a tetrahedron.
The process of disassembling the handle must begin by removing the plugs around it. They are fastened with self-tapping screws or pressed tightly. They are very easily removed using a minus screwdriver.
On one side of the door you need to unscrew the fittings and remove them. Then the second part is removed, on which the axle rod remains.
If the handle is with, then it is also removed.
Following consistency and accuracy will allow you to remove the mechanism without problems, without damaging parts or creating unnecessary hassle.
How to remove the handle from a rotating interior door with a rosette?
When rotary-type fittings do not have a hole on the side into which a key or screwdriver can be inserted, the elements are separated manually. Both parts of the handle should be twisted in different directions and gradually removed from the thread. There will be an axial rod on one of them.

In a similar way, the socket is removed and the screws are unscrewed. When the axle is removed, you can work on the following elements - a latch or lock, if necessary. When decorative parts are removed, you need to monitor the use of your force, because if you overdo it, you can damage the elements.
Removing the rotary handle
The handle with a lock for swing-type interior doors is removed as follows.

To do this, you will need a key to clamp the spring mechanism. Often it is not included in the packaging with the product, but it can easily be replaced by a nail or other thin object.
The first step is to remove the decorative plates, which can simply be pryed off with a sharp object.
Use a key or a nail to move the spring-loaded pin, inserting the tool into the technological hole located on the side. At the same time, pull the handle and remove it along with the cap.
Then you need to remove the fastening screws located on the plate. Then the two parts of the handle can be removed along with the axle.
Reassembling the round door handles is not difficult, you just need to do all the steps in the reverse order. First comes which is fixed with a plate, then the axle is inserted, and fasteners are put on it. Decorative inserts are installed last. The main thing is not to forget that the decorative flange is threaded through first, and only then the main part of the handle is attached.
Removing the stationary handle

How to disassemble a stationary door handle? They are less likely to break or become deformed. This is due to the lack of moving elements in it. Often door handles of this type are not repaired after removal, but replaced entirely. The removal process is as follows:
- Use a screwdriver to unscrew the screws.
- One part is unscrewed from the rod, and the second is removed along with it.
This design may not have a central rod; this greatly shortens the process. You only need to select the right screwdriver to unscrew screws of a certain diameter.
Remove the handle with the latch
First of all, when dismantling the latch handle for interior doors with an automatic lock, you need to remove the screws using a screwdriver. Next, unfasten the overlay elements. Use to unscrew the rod.

After this, pull out the rotating mechanism wrapped with a spring.
Popular method
There are several ways to remove the latch handle for round interior doors with a lock. Here is the most popular one.
You need to remove it with a screwdriver, first from the part where the locking device is located. You must press down on the opened stopper and at the same time pull the handle towards you.
Then the latch is pulled out, for which the screws are unscrewed, after which the latch is released.
Thus, disassembling any door handle with your own hands is not very difficult.
Interior doors are sold without fittings; the delivery set includes only the door leaf and posts from which the door frame will be assembled. There are no factory-made holes in the canvas for installing locks and handles. This is due to the fact that handles, while standardized, come in different designs and sizes. In addition, the choice of accessories depends entirely on the preferences of the buyer. Therefore, a person who has started a renovation and replacement of interior doors is faced with the problem of choosing whether to invite a professional or install the handles himself. It should be noted that if you decide to install the doors yourself, you will definitely be able to handle the installation of door handles.
Types of handles for interior doors
Door handles for interior doors can be classified according to installation method, method of operation, shape, material, and the presence of a lock.
Based on the installation method, there are stationary (overhead) and mortise models. Overlays are attached to the door leaf, and for mortise ones you need to drill holes in it.
According to the method of work there are:
One of the most popular materials for the production of door handles is brass. In addition to its excellent aesthetic properties, brass is practical and durable.

As a rule, complex locking systems are not installed on interior doors. The exception is a plumbing lock installed in bathrooms and toilets.
Installing a handle on an interior door
Let's look at the installation features of the most popular model for interior doors - knob handles. Handles are usually installed on a hung door, but many experts recommend removing the door leaf for installation. True, this cannot always be done easily.
Advice. If the door leaf is not removed from the hinges and the installation is carried out with the door in a suspended position, move a chair or some object towards it so that the door remains motionless while you work.
Installation tool
You will need the most common tool, which is found in every home:

A marking diagram is included with the door latch, but it is easy to make marks for the holes without it. 1.0 meters are measured from the bottom edge of the canvas on both sides. You need to measure 6 cm from each edge of the door and make a mark. Using a square, draw a strictly horizontal line that will connect these two points. At the end of the canvas, a mark with a pencil and an awl is placed on this line in the center. The latch strip is applied and the veneer is cut with a sharp knife. We remember that the strip must be recessed into the door leaf so that it forms a single surface with the leaf.
Some experts advise starting drilling from the end of the blade with a feather drill. With this sequence of work, when drilling with a crown, the chips will fly into the hole already made, and not clog the teeth of the crown.

The feather drill should go to the depth of the shoulder blade, no more. The drill is pressed to a point at the end of the blade and a hole is drilled. Then, using a crown, holes are drilled alternately on each side of the canvas; there is no need to make them through. As soon as the tip of the crown appears on the opposite side, you must stop the drill and start drilling on the other side. This way the veneer will not be damaged when the crown comes out.

After the holes are ready, using a chisel and hammer, we make a selection along the line cut with a knife under the latch bar. Install the latch and tighten it with two self-tapping screws. It is better to take not the “standard” self-tapping screws that come with the latch (they are usually soft metal), but high-quality ones.

Using the key included in the kit, we disassemble the handle into two parts so that it can be installed. To do this, one mounting screw must be loosened and the other unscrewed. The central rod is inserted into the hole and the fastening screw is tightened tightly on one side. Then the second half of the knob handle is put on the rod, and the second screw is tightened. Self-tapping screws are screwed on both sides, which will cover the decorative trims and the screws will not be visible.

After installing the knob handle, all that remains is to install the “return” on the box. The door is closed, but not completely, and the upper and lower edges of the tongue are marked with a pencil. Using a square, the distance from the edge of the leaf to the center of the latch strip is determined, and this dimension is transferred to the door frame. Then a “return” strip is applied to the box, the veneer is cut with a knife, and a chisel is used to cut out the strip and tongue. The door is closed and the latch is checked.

Then the strip is installed on the box. Special “pockets” for recesses under the tongue are sold; they are made of plastic or metal. The screws that secure the return strip can be covered with self-adhesive plugs. After this, the installation is complete.
How to disassemble and reassemble an interior door handle?
An installed knob handle can be disassembled in two ways, depending on its design. Unfortunately, most of these models are of rather low quality and often fail.
Disassembling one structure begins with carefully prying and removing the decorative trim. The lining has a special groove, usually it faces down. The ball-shaped handle will interfere with unscrewing the screws, so you need to press out the locking pin and at the same time, with a little force, remove the handle from the central rod. Once the handle ball is removed, it will be very easy to unscrew the screws.

To disassemble the second structure, which does not have a locking pin, you need to press the spring-loaded pin through the technological hole with the key supplied and remove the handle ball. If the key is not long enough (this happens), use a simple nail. Then the decorative trim and screws are unscrewed. If you cannot find the spring pin through the access hole, it means that the knob handle was not assembled correctly. Rotate the decorative trim 180° and the problem will be solved.
The handle is assembled in the reverse order.
You can carefully remove and disassemble the door handle yourself without damaging the door leaf. Many people have experienced a faulty interior door handle. If it stops working, or problems arise that interfere with the comfortable and unhindered opening of the door, it is worth disassembling it and checking the reason. In the future, determine the cause of the breakdown and eliminate it. If the handle cannot be repaired, it should be replaced with a new one. In this case, you need to know how to disassemble the structure, assemble it or replace it, so as not to call a specialist for help.
Deciding on the look: how to disassemble a door handle
Handles are often exposed to people who live in an apartment or house. Therefore, pen breakage is no exception and can happen at any time. In order to find out why the handle broke, it is worth disassembling it and making sure what the reason is. Then repair it or replace it with a new one.
In order to disassemble an aluminum door handle, you need to know what type it is, since the mechanism depends on the model. After this, carefully remove it from the door.
Before you start disassembling the door handle, you need to decide on its type
The following types of handles exist:
- Push;
- Stationary;
- Rotary.
The push handle has the shape of the letter “G”. Its mechanism includes a tongue, with the help of which the opening process occurs.
The stationary handle is attached to the door leaf using screws/screws. It may have an axial element and be located on both sides of the door.
The rotary handle has the same mechanism as the push handle. When opening it you need to turn it. The model may have a round shape and look like a ball. To disassemble the handle, you need to remove it. To do this, you need to carefully separate it from the door leaf using a screwdriver.
Reasons for disassembly: how to remove the door handle of an interior door
Almost all pens have a similar disassembly process. If you know how to properly disassemble the handle, you can do it in half an hour. To do this, you need to understand how it works in order to unscrew it.
Reasons for disassembling a door handle:
- Failure – breakdown;
- Repair work;
- Replacing the old model;
- Loss of original aesthetic properties (scratches, abrasions).
If a cheap handle is installed, you should expect that it may break soon after installation. Door handles made in China have a short service life and are inexpensive. That's why many owners install such handles. But in order not to make repairs or replacements every time, it is worth choosing higher quality fittings for the interior door.
As a rule, door handles on interior doors are replaced if they break or lose their original properties.
During the renovation of an apartment, its interior can change dramatically. The old handle may not fit the updated version of the room/apartment. Therefore, you have to disassemble the previously installed handle and replace it with a new one.
New pen models are appearing on the market. They may have advantages over older models: updated and simplified mechanism, shape, color. Some people exchange old handles for new ones because they saw a product on sale that was better or of higher quality than what they had previously installed. This is also the reason for disassembling the handle.
If the handle has lost its original properties - appearance, then this is another reason to install new fittings. All door handles are subject to frequent exposure. Over time, scratches appear on them, and the decorative coating wears off. All these flaws spoil the appearance of the metal handle.
Repainting a handle is unprofitable, time consuming and not always possible. It's easier to replace it with a new one.
Step-by-step instructions: how to disassemble the round handle of an interior door
There is a certain scheme according to which round pens (knob pen or loku) are disassembled. To repair or replace it, you should carefully and carefully disassemble the handle structure. Disassembly will not take much time if you follow the instructions.
You can disassemble the round handle yourself if you carefully read the training instructions
Instructions for disassembling the round pen:
- Prepare the necessary tools for work (screwdriver, wrench with stop);
- Remove the trim around the handle;
- Press the open stop with a special key;
- Turn one handle (keep the other one stationary);
- Pull the handle on one side and remove;
- Unscrew the screws;
- Remove the handle on the other side;
- Unscrew the screws (they hold the latch);
Disassembly is done quickly using these instructions. The main thing is to carefully carry out all actions so as not to completely break the mechanism, because sometimes you can replace only one element and it will work.
How to replace a door handle with a lock: disassemble the push model
The push handle model is popular. It is installed not only on interior doors, but it is also suitable for entrance doors if it has a lock in its structure. In order to remove this handle, with a built-in latch or lock, you will need a little time and a screwdriver.
Before you start replacing a door handle with a lock, it is better to prepare the necessary tools in advance
Steps to remove the lever handle from the door:
- Unscrew the handle (its pressure part);
- Remove the trim;
- Unscrew the screws (which are hidden under the cover);
- Remove the first part of the handle (hold the other in a stationary position);
- Remove the second part of the handle together with the axial part.
If you need to disassemble the lock itself, then you need to unscrew the plate (from the end of the door). Then remove the mechanism itself.
In the case where the handle moves away from the door, it is not necessary to remove it completely. It is enough to tighten the bolts with which it is attached to the door.
To install the handle, you must first install the mechanism itself, then the handle and screw on the cover.
Sometimes the reason a pen doesn't work well is because it needs to be disassembled, cleaned of dust or lubricated. Or turn over the fittings if they have taken the wrong position over time.
How to disassemble a lock on an interior door (video)
The door handle is an integral part of the door design. Therefore it should work properly. It is not necessary to call a technician to replace or repair the door handle. It is enough to know a little about the mechanism of the handle that needs to be removed and take into account the instructions for disassembling it. In order for the door handle to work smoothly: it does not make sounds, it turns or presses well, the latch does not jam, you need to periodically lubricate its component parts of the mechanism and clean them from accumulated dust.
The modern market of finishing materials offers a large selection of door handles. The most reliable handle models are round ones. Round handles have reliable performance characteristics. But from time to time they may break down or there may be a need to completely replace the entire door opening mechanism. Therefore, many property owners have a question: how to remove a round door handle?
Types of door handles
Before you begin repairing or replacing the door opener, you must determine what type it is. Currently, there are several types of pens:
- push handles;
- knob pens;
- stationary mechanisms.
Lever handles can be installed both on interior doors and on entrance (outdoor) doors. Their characteristic feature is that the door latch goes into the inside of the door leaf when the handle is pressed. In the normal state, the locking mechanism is in the extended state.
Such locking mechanisms are most often installed on doors that have mortise locks. Protective pads are installed on them, so dismantling the handle must be done carefully so as not to damage the pads. Moreover, you need to remember the place where the latch was located.

The round handle should be removed very carefully so as not to damage the elements of the mechanism.
Knob handles are most often used to close interior doors. They are made in the shape of a ball, in the center of which there is a keyhole. You can open such a lock using a key only on one side; on the opposite side there is a locking button.
Stationary door mechanisms are manufactured in the form of special strips equipped with various brackets. They are fastened directly to the door leaf using self-tapping screws or self-tapping screws. This handle is equipped with a roller latch, which allows for reliable fixation of the door passage.
Disassembling the round handle
To remove the door handle, you need to prepare a slotted and Phillips screwdriver. During this process, a stop wrench will be useful, which should be supplied with the mechanism.
Initially, using a slotted screwdriver, you need to pick up and remove the round cover located around the mechanism. Next, using a stop key, which, if missing, can be replaced with a thin, sharp object, you need to press the stopper and pull the handle towards you. The handle must be pulled carefully to prevent breaking of the mechanism elements.

After the cover is removed, you need to unscrew the screws on its side. The number of screws may vary on different models, but on average it is 3-4 pcs. Now you can remove the door handle from both sides of the door. Lastly, unscrew the fasteners that hold the latch mechanism in place.
After the functionality of the entire mechanism has been checked, it is necessary to install the remaining parts and a decorative plug (bar) in the clamping part. In this case, the square profile located in the design of the locking device must be completely recessed into the latch. To do this, the latch must be rotated so that its edges coincide with the edges of the rotating square rod.
The final stage of work
At the final stage, it is necessary to push the removable parts of the handles all the way. In this case, the decorative strip must be installed so that its groove is aligned with the fastening mechanism. Otherwise, it will simply not be possible to assemble the entire locking structure.
After assembling all structural elements, it is necessary to check the quality of work and fixation of the door. To do this, you need to turn the handles on both sides of the door until they stop. In this case, the turn should be easy. There should be no clicking sounds. This procedure should be repeated 5-6 times. If everything works smoothly, you can proceed to operating the door.

From time to time, situations may arise when there is no need to change the entire closing mechanism, but only need to replace the side of its rotation. To cope with such a task, you need to rebuild the entire structure of the castle. To do this, remove the handles and lock the latch in the closed position.
Then you need to turn the handle with the locking part in the reverse position and insert it into the locking mechanism. Next, the second handle is inserted, all fasteners are tightened and the build quality is checked.
Working with stationary door handles
If the doors in the house are equipped with stationary opening mechanisms, then using a screwdriver you need to unscrew the screws on its main part. After this operation is completed, it is necessary to inspect the handle. This will help determine whether there is damage to it. If a breakdown is detected, it is best to completely replace the entire constipation.
It is better to replace the constipation with a similar design. If this is not possible, then you need to make sure that the fixing pad on the new device matches the previous model. This will help avoid drilling additional holes, which are often simply impossible to complete. This is due to the fact that the new holes will partially overlap the old ones. This will lead to an increase in the overall diameter of the hole, which will not allow for reliable fastening.

To avoid making a mistake in such a choice, selecting a new handle should be done only after dismantling the old one. And then, with this sample, go to the store and select the required model.
Also, such locking devices can be equipped with a common rod. To determine this, you need to hold the handle on one side of the door and turn it clockwise on the other side. If a single rod is installed, the second handle will unscrew. After this, the reverse side needs to be pulled out of the door. This must be done carefully so as not to damage the threaded connections.
Handles with mechanical latches
Those handles that are equipped with mechanical latches must be removed most carefully so as not to break the entire mechanism. Their dismantling is carried out using a screwdriver, which unscrews the mounting screws. Then the decorative trims on both sides are removed. At the same time, you must not bend them, because they are made of thin steel.
The main feature of such devices is the lining, made in the shape of a tetrahedron, and the unique mechanism of the tongue that performs the latch. Therefore, during work, you need to place all removable elements strictly in order, so as not to forget the installation location later.
When all the mounting hardware is removed, you need to inspect the entire structure and understand how the handle is attached. If a hole is made on a tetrahedron-shaped rod, then there should be a similar hole in the handle with the same diameter. A small pin is inserted into such a hole, which has a cap on one side.
If there is a similar pin in the design of the door closing mechanism, then the handle is quite easy to remove. To do this, you need to remove the plugs and carefully pull out the pin.
The cap with which the pin is equipped will prevent it from falling out of the hole while the mechanism is turning. Therefore, it must be remembered that when reassembling, the pin must be inserted so that its head is at the top of the hole.
When carrying out work to dismantle the handles, you must remember that all work must be done carefully and accurately so as not to damage the elements of the entire mechanism.
Moreover, you need to lay out the parts in such a way that you don’t forget the place where they were installed later.