Making decorative plates at home. What you need to know about decoupage plates. Making a decorative plate for the kitchen with your own hands
Plate painting is one of the oldest activities that has survived to this day. Previously, such items were used to decorate shelves in sideboards and walls. They were passed down from generation to generation. Also relevant today. They will be an excellent piece of kitchen or dining room decor, and you can involve your children in the process of creating a masterpiece.
Features of the technology
Painting a plate is not such a simple matter. To obtain a real masterpiece, professionals take special courses where all the subtleties of this skill are revealed. But absolutely everyone can know it. You just need to take into account some of the nuances regarding such a process as plate painting.
Drawing technique involves the correct selection of tools and materials. The most important item here is the decorative plates. Painting can be used to decorate items made of ceramics, porcelain, glass, and wood. The main thing is that they should not have a factory design.
You can create a pattern using the following tools:
- water, acrylic. The latter are the most popular, as they are the most common, and even a child can work with them.
- Felt-tip pens (special indelible ones).
Thin brushes are most often used. But it all depends on the drawing. Sometimes you need several types of brushes - from the thinnest to the most magnificent.
In case your drawing doesn't work out, you should have some paint remover on hand.
Types of painting

Painting a plate is an art! There are a great many types of techniques:
- Tiffany - allows you to achieve the effect of a three-dimensional pattern.
- Khokhloma is a fairly famous painting. The patterns are made in black, red and gold colors.
- Dotted - a drawing is created using dots.
- Gzhel - simple lines, drops, meshes, flowers. Everything is done in blue tones on a white background.
- Captions are simply words, phrases, lines, and so on.
- Geometric patterns are designs consisting of various lines and shapes.
- Whole composition (landscape, still life).
Of course, that's not all. There are also other types of painting, most of which come from ancient times. But we have listed the most popular ones.
Operating procedure

Regardless of the degree of complexity of the drawing, there is a generally accepted sequence of actions:
- The plate to be painted is degreased using alcohol or window cleaner.
- A primer is applied to help the paint adhere better to the surface.
- A sketch of the drawing is prepared on plain paper.
- The design is transferred to the surface of the plate. How this happens depends on the application technique and image style.
- Attention is paid to the elaboration of details (for example, the outline is completed).
- The plate is dried for 24 hours in the open air or in the oven for 40 to 60 minutes.
Simple geometric pattern
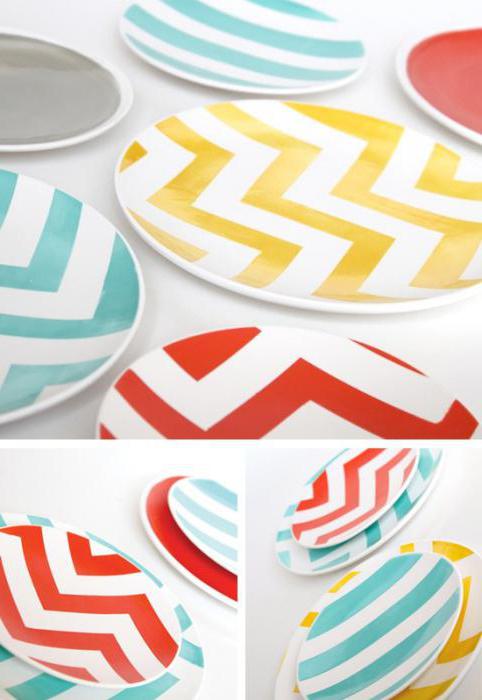
Perhaps the easiest and fastest way to paint a plate is to use paints and masking tape. Thanks to simple manipulations you can get a bright decor.
So, prepare the plate for painting (clean it and degrease it). Then take masking tape and stick the strips onto the surface. Where we have tape, the plate will not be painted, keep this in mind. The pattern can be varied. This is usually how zigzags are created.
Now paint the entire plate with bright paint. For this work you will need to take a fluffy brush, as it will cope with the task faster. Let the paint dry a little and then remove the tape. Now you can dry the plate.
Finger painting with children

It's a great idea to paint a plate with your children. To do this, you don’t need to look for and come up with special pictures. You can simply immortalize your child's fingerprints.
First, prepare the surface of the plate. Then take brown paint and paint the trunk and branches of the tree. Then take a regular sponge and coat its surface with some paint. Now gently touch the washcloth with your fingertips and then leave an imprint on the plates. The fingerprints will serve as leaves.
By the way, in this way you can collect prints of friends and relatives at the wedding as a keepsake.
Silhouette and ornament
Painting the plate will help you decorate your dishes simply and tastefully. You can do this as follows:
- Prepare your plate for use.
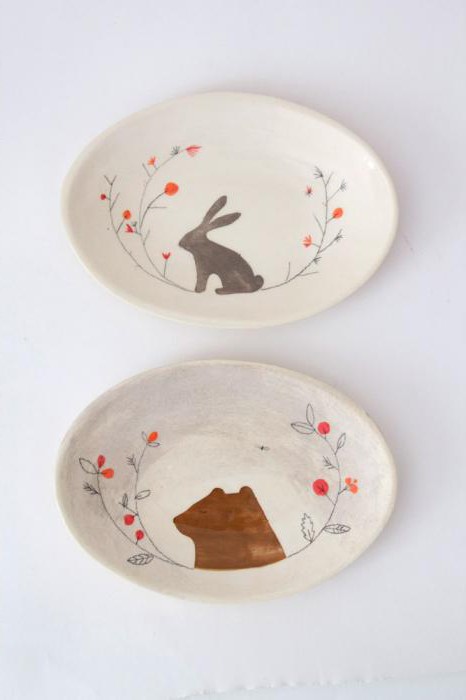
- Take a thin brush and draw the silhouette of an animal below (for example, a hare, a bear, a dog, etc.). Do not make the outline clear; to do this, dilute the paint a little with water on the palette.
- Then take the thinnest brush and draw a couple of arcs from the silhouette. Draw leaves and flowers on them using lines or dots. Choose contrasting colors for plants.
- Dry your work.
In this simple way, you can create a whole series: on one plate there will be an image of a hare, on another - a fox, on the third - a wolf, and so on. The whole essence of the work lies in the simplicity of the lines and the play on contrasts. With the help of small bright details, a playful mood is created, and the overall palette does not strain the eyes.
Careless thoughtfulness

This kind of work looks like it took at most five minutes to complete and is the result of someone's negligence. In fact, the presented painting of plates with paints is also the fruit of the efforts and imagination. To work, you will need liquid paints, a brush, an old toothbrush and rubber gloves.
Dip the brush into the paint container and bring it to the plate. Start placing chaotic drops on the prepared surface. There is no need to build a clear sequence - first smooth and small, then large with wavy edges. Let all the drops be uneven and different in size. Place them in different places. It’s worth mentioning here that the paint should drip from the brush on its own, so pick it up without sparing it.
Then dip your finger in the paint. Run it around the edges of the plate, making a border. An old toothbrush will help you finish the pattern. Dip it lightly into the paint, and then run your finger along the bristles, pointing your “tool” at the plate. Dry the pattern.
Bitmap without pattern

Dot drawings are quite a fun activity. And at the same time - long and painstaking work. But the result is always worth the effort.
Plates with acrylic paints can be made using a template or without it. Let's look at the second option first. It is used for simple patterns, and the first one is used for more complex and intricate ones.
Bitmap drawing suggests that the picture will be drawn not using lines, but with dots that are located next to each other. This type of painting can be done either with paints and a brush with a pointed end, or with markers.
First, as always, you need to prepare the surface of the plate. Then the future drawing is thought out. You can take any picture as a basis, but it’s easier to use this technique. Then the paint is applied to a palette or piece of paper. The material is taken onto the brush very carefully. Excess paint must be removed.
Then the magic begins. Use a brush to gently touch the surface of the plate. If this is not done, smears will result. But the drawing consists of dots. You need to work slowly, trying to ensure that the drops are the same in size. This is how the entire pattern is applied. By the way, you need to work from top to bottom so as not to accidentally blur the drawing.
Depending on the design, the dots can be of different colors and diameters. But the picture should be clear. Therefore, lines relating to one element (for example, the core of a flower) are made in the same shade and with dots of the same diameter.
Bitmap by template

At first glance, it may seem that painting according to a template is very simple. Actually this is not true. First you need to prepare this very template. To do this, you can use ready-made pictures or make an illustration yourself. Since a bitmap does not involve painting, the template on paper is made only in outline (for example, a flower will be depicted only with the help of petals). By the way, in the case of a paper model, you can only decorate a transparent plate.
So, prepare the surface for work. Then cut out the template along the extreme outline. Now glue the paper to the back of the plate using electrical tape. Prepare your paints and brushes. Now you can start drawing. Place dots along the top of the outline. Start working, as in the previous case, from the top so that the drawing does not become smudged.
When the work is ready, let the plate dry a little. Then carefully remove the template. If desired, the reverse side can be painted over, thereby giving a background to your pattern.
A few more ideas

Painting plates with your own hands is a fascinating activity. In the process of creating one craft, an idea for the next one often arises.
Here is just a small part of the possible plate design:
- With the help of thin wavy lines you can make not just patterns, but entire drawings. Just sketch the inside of the silhouette not with solid strokes, but with curls.
- You can collect words from plates. Each saucer is one letter. It must be placed in the center. The space around the letter can be decorated with small patterns (for example, floral).
- Original painting - face. You just need to draw the eyes, nose, mouth and cheeks. The remaining part can be covered with some kind of continuous pattern.
- Plant motifs are always relevant. Flowers and plants can be drawn in various ways: filling the entire space of the plate or just the outline, strokes, dots, solid color, strokes, and so on.
- You can also make a special painting for each holiday. So, for example, plates with snowmen, Christmas trees and Santa Claus would be appropriate for the New Year, pumpkins for Halloween, painted eggs and Easter cakes for Easter, and a mimosa branch for March 8th.
Decorative plates can be seen more and more often in our homes. This is one of the most sophisticated and beautiful decorative elements. Wall plates are especially in demand in this regard. Decorative plates can add unique charm and comfort to your home.
An important point: decorative plates are not intended for food, they are not everyday utensils. Such dishes are equivalent to artistic paintings or fashionable panels.
If you tastefully place such decor on the wall, you will be guaranteed a good mood and positive emotions.

Plates in the interior can be placed in several ways:
- On the wall.
- On a stand.
- On shelves with slats.
Wall plates can be porcelain, ceramic, glass, and so on. Porcelain plates are the most popular and in demand. Thin and translucent, they are ideal for decoration. Different themes of the design allow you to place this decor in different rooms. Thus, dishes with patterns of fruits, bright flowers, and berries are more suitable for the kitchen.


Porcelain or ceramic plates with abstraction, artistic landscapes, pastoral scenes will come in handy in the living room. It can be either bright, rich colors or pale, pastel painting.


It’s not enough to buy beautiful decorative plates; you also need to hang them on the wall beautifully and reliably, with your own hands. There are many options for placing such amazing dishes.
Wall plates can be hung in several ways. For example, in one row. In this way, you can focus on some object, furniture - for example, a fireplace, mirror, or sofa.


The wall on which the plates are placed symmetrically looks very nice. This is possible if you have several plates of the same shape, and there is a certain symmetry of objects and furniture in the room.
Be careful not to overcrowd the space, otherwise you will end up with a shapeless, tacky spot.
Let there be fewer plates on the wall, but it will look more elegant and lighter.


Decorative plates on the wall can be placed in the shape of a cloud or a wave. This decor will look good on an empty wall, especially if the dishes are of different sizes and shapes, but with the same pattern. You can also hang dishes in the form of geometric shapes: circle, rectangle, square.


Plates for decoration can be purchased; they do not have to be expensive porcelain. You can decorate them with your own hands, making them unique from simple things. There are many options for decorating dishes, even if you are not good at drawing, you can always choose an option for creativity. You can do the work yourself using the following techniques:
- Decoupage.
- Point technique.
- Glass painting.
- Stained glass.
- Decor with ribbons.
- Craquelure (using eggshells)
- Marmoration.
- Quilling.
The easiest option is to use acrylic paints and stencils. You need to print the stencil, transfer it to a plate using carbon paper, and paint it with acrylic paints. There are tons of stencils and beautiful designs, especially in the vintage style. You can make unique things with your own hands.

A few simple tips will help you display your plates beautifully on your wall. It seems like such simple things, but sometimes we forget about them.
- Plates with small patterns should not be far from each other. For plain dishes, the distance does not matter.
- If your interior has pale, light colors, you don’t have to be afraid of bright, rich colors of dishes. And vice versa - if there are enough bright things and accents in the room, it is better to choose dishes of the same color, maybe in different shades, but not bright and colorful.
- Of all the options for placing dishes with your own hands, the most popular are vertical, oval around a picture, panel, or mirror.
- Wallpaper that looks like a single color from afar is the best background for wall plates.

In the store you can buy special transparent holders for wall decoration, but if you can’t buy them, you can make fasteners on the plate yourself. There are several fastening methods.
Method No. 1

To work you will need:
- Hinges for paintings (sold in art stores and at the construction market).
- Glue Moment or Poxipol.
- Plate.
- Painting tape.
- Sandpaper.
First, lightly sand the place where we will glue the loop with sandpaper. Degrease the surface. Take picture loops.

We choose any glue from those that we see in the photo. We coat the loop and place it on the plate.

Creating decor for your own apartment or an original gift is an interesting and exciting activity. One of the types of applied creativity is the decoration of plates; they usually decorate the kitchen interior. So if you decide to add some zest to your own kitchen or make a beautiful and cozy gift, then decorative plates made from scrap materials with your own hands will come in handy.
A plate made in the same color scheme or matching the interior will help you save money on buying expensive decor and will make your home truly original, cozy and beautiful. Where to start?
Making decorative plates with your own hands: decoration techniques
Decorative plates are created using a wide variety of techniques and using various materials. This can be decoration using decoupage and quilling techniques, decoration with ribbons, different types of painting - stained glass, dotted, marble and others. As a basis, you can take either an ordinary ceramic plate or a clay plate, or cut out a circle of plywood of a suitable diameter and work on it.

To work, you will need a round base, a bowl of water, glue, a brush, scissors and acrylic varnish, as well as a suitable image - a postcard or a printed drawing.
Apply 5-7 layers of acrylic varnish to the image, allowing each previous layer to dry thoroughly. When all the varnish has dried, place the image in a bowl of water for 10-15 minutes, then remove and separate the paper from the varnish layer. We cut out the desired fragment of the design, place it on a plate and fix it on it also with varnish. You can secure the plate to the wall using a rope or a lid with a ring from a tin can, secured with strong adhesive, and also place it on the table using a special stand. The result is a wonderful decoration with a minimum of costs.

If you know how to draw or just like to draw, then you should definitely try painting a plate. There are several ways to do this: stencil painting, dot painting, stained glass, artistic painting and others. Each artist will be able to choose a method according to his taste and strength.
For drawing, acrylic paints are used, which are self-drying and require baking, and special markers for glass and ceramics. If you have enough experience in drawing or your soul requires improvisation, you can create a pattern right on the go or use the art painting technique, when a plate becomes a canvas and entire pictures are created on it. It will be easy for a beginning artist to work using stencils or using the dot painting technique.
Spot painting.Dot painting is a technique of drawing and creating contours using dots, which creates a spectacular three-dimensional image. Plates decorated in this way look as if they are embroidered with beads or seed beads. To work, you will need acrylic paints; you can paint with them directly from the tube, or, if this method seems difficult, use a small brush or toothpick. First practice placing dots of different sizes and maintaining the same distance between them.

Before work, degrease the surface. For a beginner, the best option would be to use a transparent glass plate, on the back of which you can glue a pattern template. You can also transfer the drawing onto a plate using tracing paper. We begin work by drawing large general contours, then move on to small details.
We leave the plate to dry thoroughly during the day; you can speed up this process using a hairdryer or by baking the plate in the oven for half an hour at a temperature of about 160 degrees. After complete drying, secure the design with varnish.

When creating a decorative plate, the final result depends only on the master, who can use not only various techniques, but also their combinations. For example, to create a plate like the one in the photo below, we will use the decoupage technique along with dot painting.

So, we prepare the base and degrease it. Next we work using the decoupage technique. We select a suitable image, treat it with varnish and let it dry. Soak it in water, separate the design, cut it out and fix it on the plate, not forgetting to leave a free edge for painting. After the varnish has dried, we paint the edge of the plate, and also add volume to the drawing using the dot painting technique and cover it with a finishing layer of varnish. Do not forget to properly dry all layers of work. The result is a wonderful decorative plate in the Provence style, which can easily decorate a suitable interior or become a very original gift.
Of course, there are many techniques for decorating plates, for example, more complex stained glass painting or marble techniques. However, you should not immediately strive for complex work, as we see that even the simplest techniques give an amazing result in the end if you put in a little effort and add inspiration. Don’t be afraid to try, make mistakes, look for suitable ways, and creating decorative plates will give you many pleasant emotions.
Video selection on the topic of the article
Finally, a small selection of master classes on decorating plates quickly and easily with your own hands:
Harmoniously selected plates on the wall in any interior will look stylish and fashionable. This is a great alternative way to decorate a room. Nowadays, this decor option is still relevant and is actively used by designers when creating luxurious luxury interiors. At the same time, it is not at all necessary to purchase decorative or souvenir plates; you can create a beautiful composition from ordinary dishes you have. For example, gift plates with views of cities brought from different countries will not only decorate the wall, but will always remind you of a wonderful vacation and happy moments in your life.

Five basic rules for wall decor using plates

The tips listed below will help you create with your own hands an original composition from any plates (gift, decorative, etc.), which will become a “highlight” in your interior.
Match the plates with the style of the room. For a classic style, porcelain with floral patterns in white and blue colors or gold plated are suitable. For a modern style, bright and colorful patterns are used. And in country style, white or cream ceramic dishes will look ideal.

When choosing a color scheme for a wall composition, make sure that it is combined with other details in the interior, for example, with the color of floor tiles, furniture or textiles. You can hang plates with any designs on a plain background.

Apply the principle of contrast when creating a wall composition. Light decorative saucers will go well with dark walls, and vice versa.

When composing a composition of plates, follow the main rule: they must be combined with each other in at least one way, for example: shape, color, pattern or theme.

Combine a collage of dishes with other decorative elements; for example, they will look very nice next to vases or wall sconces (see photo).

Advice! Don’t be afraid to experiment with the size and color of decorative plates: combine plain ones with multi-colored ones, and large ones with small and medium ones.

Decorative plates in eco-style


The most popular options for placing plates on the wall

With the help of gift or decorative plates, you can decorate rooms of various purposes, decorated in absolutely any style. It is believed that the optimal places for their placement are as follows:
- above the head of the bed in the bedroom;

- above the chest of drawers in the hallway or living room;

- on the shelves of a buffet or a special rack in the kitchen (see photo);

- above the console in the hallway;
- on empty walls.

To ensure that the composition does not clutter the room and looks advantageous in the interior, it is better to place the plates in accordance with ready-made schemes developed by designers. Let's look at the 9 most popular ways to place them in the interior.
Saucers arranged in one (or more) rows on a special rack, in a niche or on buffet shelves look impressive.

A composition of symmetrically arranged plates will always look advantageous and beautiful. It is desirable that the rest of the decor is also symmetrical.

You can decorate an entire empty wall by evenly distributing saucers over it.

From the plates on the wall you can create some kind of geometric or arbitrary figure, as in the photo.

An ideal option for decorating walls is a wall panel made of plates (see photo). At the same time, they should be located close to each other so that the overall pattern is clearly visible.

You can use a special display to place dishes. In this case, it should be in the same color scheme.
When decorating the wall, you can evenly combine plates and paintings, as in the photo

If the wall is wide, then the plates can be arranged in a wave shape, which will look very interesting and stylish. Moreover, they can be of various unusual sizes and shapes.

If the wall is narrow, then plates arranged vertically will look beautiful: from large to small, or vice versa.


Ways to attach plates to the wall with your own
So, you have chosen the location of the plates and come up with the composition, now all that remains is to securely mount them on the wall. How to do this easily and accurately? Ready-made fasteners can be purchased on the Internet or construction hypermarkets. For example, the only way to hang plates on the wall without using nails is to use Command Velcro. They hold dishes perfectly on the wall and are easy to stick and peel off.
You can also purchase adhesive discs of different sizes with loops or forged wall decorative holders. If you do not have the opportunity to buy fasteners, then they are easy to make yourself. But in this case, you can’t do without nails. Hinges are made from scrap materials, with the help of which the plates are secured to nails driven into the wall. The main materials from which hinges are made:
- wire;
- pin;
- clip;
- satin ribbon;
- ring from a tin can, etc.
You can attach any of the above loops to the back of the plate using Poxipol glue. To make it stick better on the plate and look beautiful, you can glue a piece of rice paper on top and coat it with clear varnish. Such fasteners will not only be reliable, but also neat. If you don't have rice paper, you can use tape.

Advice! To obtain a reliable fastening, before applying glue to the plate, it is necessary to degrease the surface and scratch it slightly.
If you don’t want to make the mounts yourself, you can purchase special decorative or gift plates in stores with ready-made mounts that can easily be hung on the wall. They can even be washed in the dishwasher without fear that the fasteners will come off.

The decor for the walls of the kitchen and rooms can be completely varied. We are used to hanging photographs, paintings, panels, embroideries and other decorative elements on the walls. But now we will talk about a more original option for decorating the room. DIY decorative plates are a great addition to your kitchen interior. The composition of these plates will be a truly original design move.
Choosing an interior style
Decorative plates are most relevant in the cozy interior of the kitchen, but they will fit into other rooms of your home, be it a bedroom, hallway, living room or even a children's room.
The main thing is to choose the right image for the decor. As for the interior styles of a kitchen or other room, the following options are best suited:

- Country.
- Shabby chic.
- Classic.
- Provence.
- Fusion
- Scandinavian style.

Making a decorative plate for the kitchen with your own hands
Looking at a beautiful decorative plate, it’s so hard to believe that anyone can create the same one with their own hands. In fact, the work process is extremely simple. You can do this yourself and even involve your child in such an interesting work. So, for work we will need the following materials and tools:
- Shallow plate (white, made of ceramic).
- Bright acrylic paints.
- Tassels.
- Copy paper.
- Ready-made drawing (you can choose the appropriate option on the Internet and simply print it).
- Pencil.
- Hot glue.
- Fastening device.

Using carbon paper and a pencil, we transfer the image from the prepared picture onto the ceramic. As you can see, even a person who can’t draw at all can create a masterpiece with his own hands. Now choose black, brown or gray paint and use a thin brush to outline the contours of the transferred image. Let the contours dry completely.
When the contours are dry, paint over the free parts with bright colors. Let the plate dry completely and attach it to the wall. That's all. The exquisite interior decoration is ready.

Mounting methods
When your product is completely ready, all that remains is to decide how you will attach it to the wall. It is very convenient that there are many mounting options, and you can choose the method that suits you.
- You can purchase Velcro at an office supply or sewing store. One part of the Velcro needs to be glued with hot glue to the plate, and the second to the wall. This way you can quickly remove the plate while cleaning.
- The second mounting option uses a paper clip. You need to make a hook from a regular paper clip and prepare a square of thick fabric. Place the hook on the plate, pour hot glue on it and immediately apply the fabric. This hook is convenient to hang on a nail.
- If you want to attach the product with a pin, you can also attach it to the ceramic with hot glue (you need to attach the head of the pin, and the opening part should face outward).
- The next mounting option is very aesthetic. Take a piece of thick tape, thread it through a metal ring and fold it in half. Glue the edges of the tape with hot glue and glue it to the surface of the product.
- You can also make simple rings from the tape and secure it to your product using cold welding.
- In addition, you can always buy a ready-made plate holder. This could be, for example, an exquisite forged holder or an almost invisible plastic holder. There are also holders for several plates at once, made in the form of a beautiful wooden shelf.
