How to remove the connecting rods from the bike. How to remove connecting rods from a bicycle with and without a puller
Active cycling requires certain skills to quickly repair vehicles. Before setting off on a long trip, it is best to foresee possible breakdowns and malfunctions of the equipment, take along the necessary tools and a set of spare parts, for example, cameras. Often it happens that the right thing was not at hand, but then there is a way out of the situation. For example, if you need to adjust the bicycle carriage, you must remove and disassemble the connecting rod, but there is no tool. This problem has a solution and it is worth familiarizing yourself with the design and purpose of this part in more detail.
The device and the purpose of the part
A connecting rod for bicycle equipment is a metal lever, which has a large and a small head on the rod. This element is of several types:
- One component. They represent a single design - the left, right connecting rod, axis. The advantages of this type are great strength, easy maintenance, but they have a significant mass;
- Two-component. Here, the drive sprocket, the right connecting rod and axle are connected, and the left one is attached separately using a nut;
- Three parts. This most famous and popular system is the axis, the left connecting rod and the right together with the star.
The load on the connecting rod is very large, and therefore they are most often made of solid steel, but there are also options from aluminum alloys, for example, in sports bikes or imported models. Inexpensive two-wheeled equipment has a front block of stars, combined with a connecting rod and non-separable. In this case, when replacing the stars, it is necessary to replace both connecting rods. New ones are selected depending on the type of carriage already available.
This bicycle part can also have various types of fastening, for example, square, slot. The first is used in professional sports models of technology, and there is also the latest development - the rotor system.
How to disassemble the connecting rod without a puller?
The easiest method is to use a special puller. If such a tool is not available, then in order to disassemble, remove and make repairs, it is necessary to make certain efforts and dexterity. During riding, dirt and dust get into the area of \u200b\u200battachment of this element, the element literally sticks to its mount due to heavy loads. In this case, you need to know how to remove the connecting rods from the bicycle without using the puller. You can fix the problem and make repairs on your own, and this will help to get to the place of repair of equipment.
In unsuitable conditions, you can try the following methods in order to remove the part. If you unscrew the nut or bolt that secures the connecting rod and drive a certain distance, the element can be disassembled and removed much easier, and then replace or adjust what is required. An effective method is to pour boiling water. Consequently, all dirt and dust will get wet and making a bicycle repair, it will be easier to remove the element. This option is suitable even when it is important to remove the pedals. It is important to know and not to confuse in which direction which pedal is unscrewed. The left pedal has a left-hand thread and the right pedal, respectively.
If the bicycle carriage requires adjustment, it is also necessary to remove the connecting rods from the bicycle. Also will help with unforeseen breakdowns and other recommendations. If the cable of the speed switch or the brake is damaged, you need to replace it with a new one, and if there is none, connect the dangling ends. Failure of a bicycle spoke is also a common problem. Then a wire with a diameter of about 2 mm will help. The end of the spoke next to the rim is bent by a hook, and then a piece of wire is inserted, which must be passed through the sleeve connector. This replacement is far from perfect, but it will allow you to get to the goal and the place where the equipment can be well repaired. Regular viewing of two-wheeled vehicles and maintenance will avoid many of these problems and make the trip enjoyable.
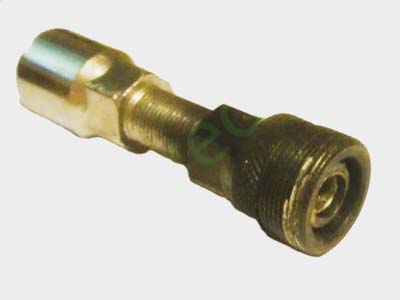
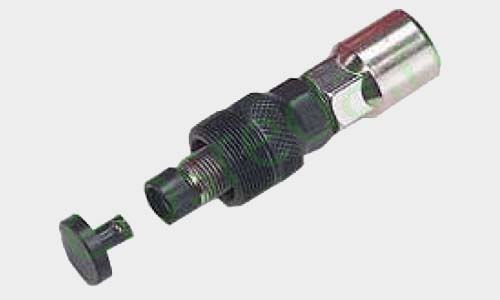
To remove the connecting rods you will need a special key - the connecting rod puller. It is a screw with a two-section head (socket wrench and face spanners), on which a specially shaped nut is screwed with internal and external threads. Often an adapter is attached to the puller for use with splined joint carriages.
When buying new connecting rods, you need to consider their method of attachment to the carriage. It can be square or slotted (slotted joints of several standards). It is also important to consider the length of the connecting rod when choosing a new one, if you buy too long connecting rods, they will touch the obstacles when driving over rough terrain, and when short, additional efforts will be required when pedaling.
Removing Bicycle Cranks
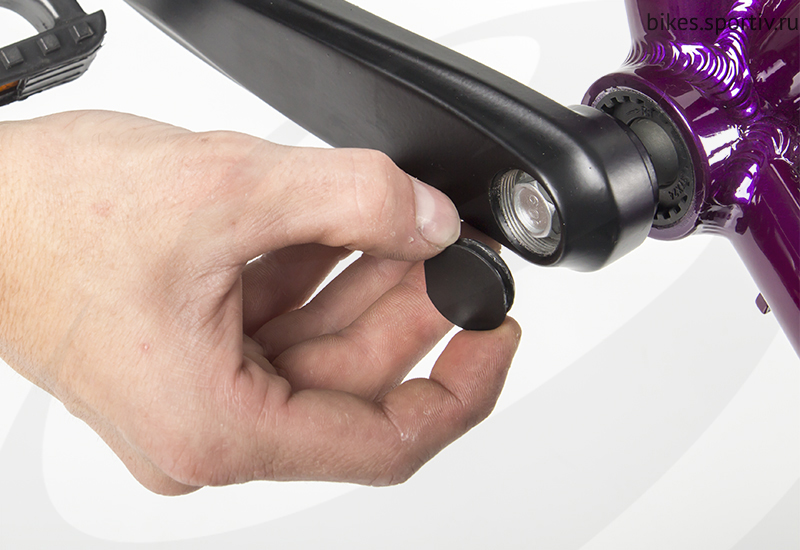
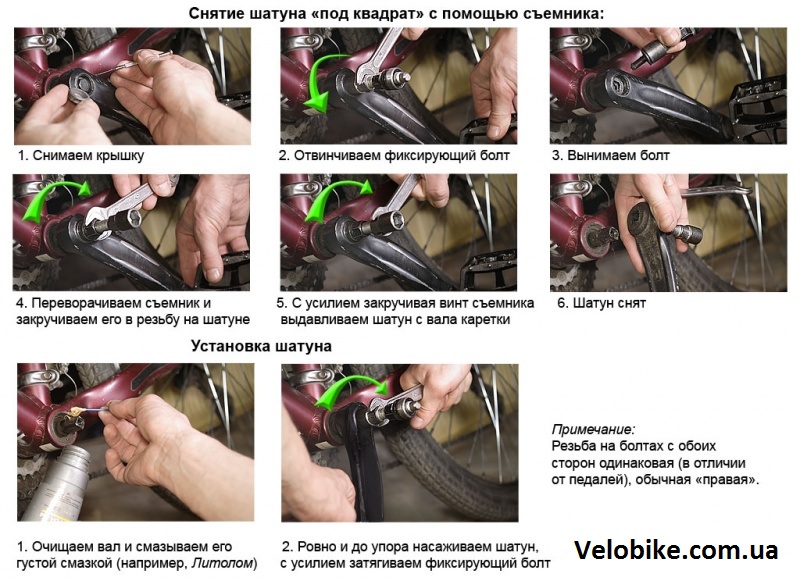
1. Remove or unscrew the boot cap.. Some plugs are enough to pry off with a screwdriver, and some will have to be twisted.
![]()
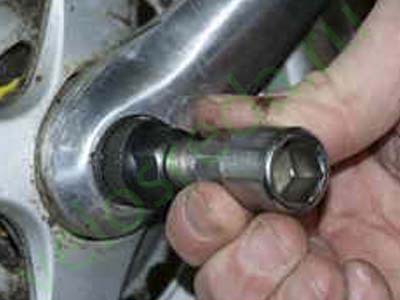
2. Remove the bolt (or nut) which pulls the connecting rod to the carriage and remove the washer (if any). To do this, you need a ring wrench (usually at 14), or an 8 hexagon for a square connection or a 10 hexagon for a spline connection.
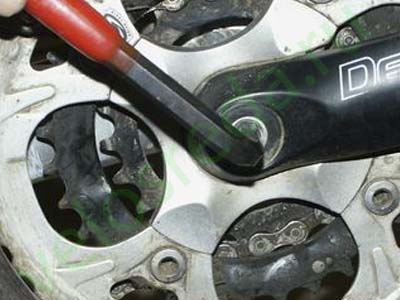
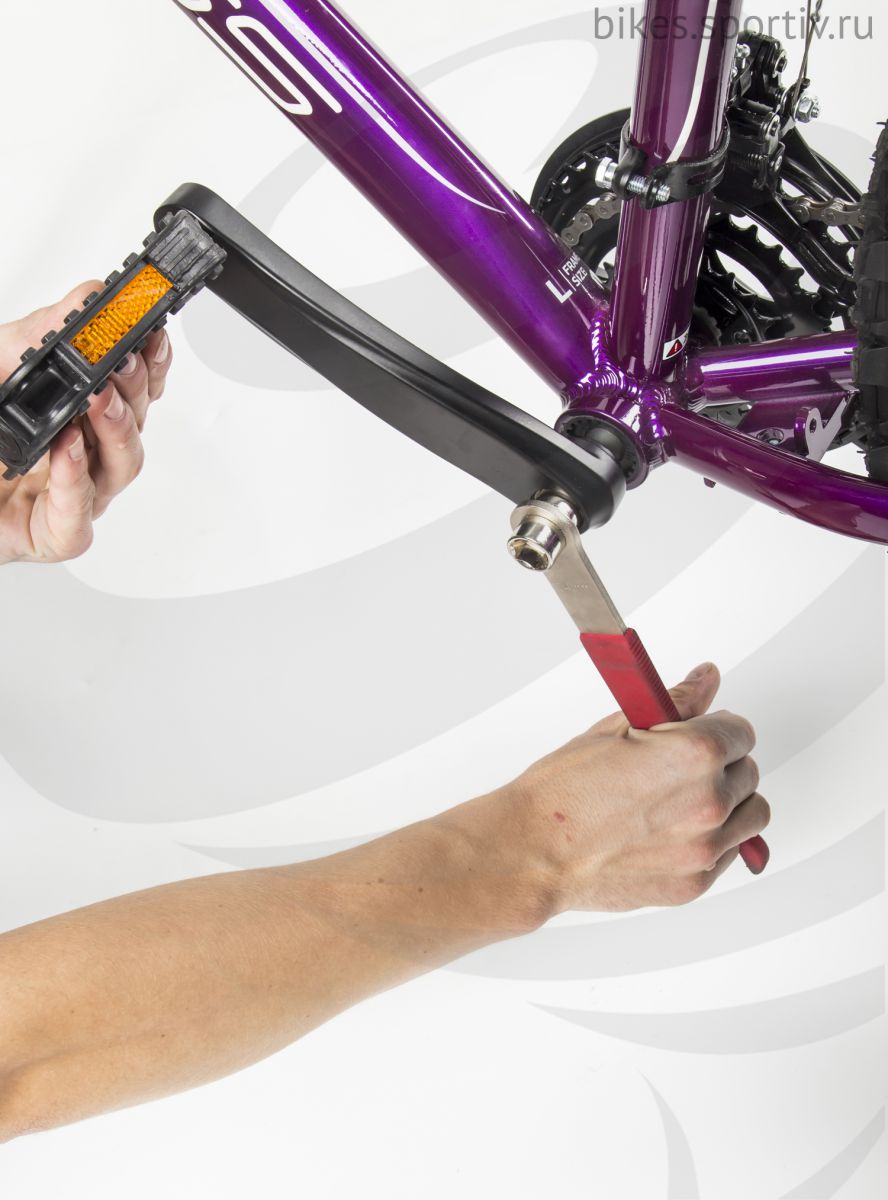
3. Take the connecting rod puller and unscrew the inner screw completely.
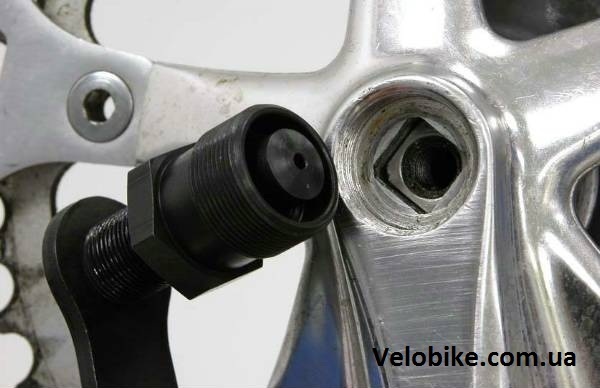
Please note that with a square connection, the inner screw should be narrower and the adapter pad must be removed (if it is worn), and with a spline wider, the adapter pad must be put on accordingly. Be careful, there have been times when people did not remove the pad, as a result, it rested on the connecting rod itself, and not on the carriage axis. As a result, they tore the thread on the connecting rod.
4. Screw the puller into the connecting rod. Screw the puller all the way, otherwise it may break and damage the thread.
5. Tighten the internal screw of the puller with a wrench. Twist it clockwise and you will see how the connecting rod comes off.
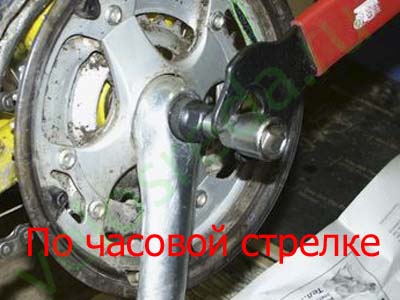
6. After removal of a rod unscrew the puller.
If the connecting rod does not lend itself in any way, do not exert too much force, otherwise you can break the thread and then it will be even more difficult to remove it. Fill the connection with oil or WD-40 and try again. When the connecting rod puller is not at hand, you can unscrew the bolts tightening the connecting rod and the carriage and drive a few hundred meters without them. After the connecting rod should be easily removed, if lightly tapped on it with something weighty (through a wooden block or stick). You can also heat the junction of the connecting rod and the carriage, but do not use any burners for heating, they will harm the connecting rod, heat it with boiling water.
And one more thing, if you need to, then it is better to unscrew them before removing the connecting rods, it will be easier.
Before installing the connecting rods, clean the joints on it and the carriage from dirt. Then lubricate the inside of the connecting rod with grease.
Put the chain on the carriage assembly (when installing the right connecting rod), put the connecting rod on the axle and tighten the tightening screw.
Putting on an opposite rod do not mix up its position.
Tighten the bolts very tightly. If it is not enough to tighten them, then backlash can form during the ride.
Put anther caps and a chain on an asterisk.
Cranks installed.
Removing the connecting rods from the bike. Why might this be needed?
- to replace them (in case of failure, for example),
- to get to the carriage (to replace, repair or lubricate it),
- to remove the creak (sometimes sand falls into the junction of the connecting rod with the axis of the carriage).
Although the connecting rods are one of the busiest parts of a bicycle, they have a simple shape, they do not require any adjustment and adjustment, therefore, difficulties with removal and installation usually do not arise. To completely remove the chain to remove the connecting rods, by the way, is not necessary, just throw it off the front sprockets.

Please note that on inexpensive bikes, the block of front sprockets can be a single unit with the connecting rod, so when replacing the stars you will have to change both connecting rods. On other bicycles, the stars and cranks can be changed independently of each other. It is also important to note that you can’t just take and buy the first connecting rod that comes across. Firstly, there are several types of carriages that differ in the type of axis, so choose compatible ones. Secondly, connecting rods are produced in different lengths (difference ≈1.5 cm). The shorter it is, the harder it will be to pedal (since the lever’s shoulder is shortened), and the longer it will be, the harder it will be to ride on rough roads (the pedal in the lower position can hit the ground).
How to remove wedge connecting rods
To begin, we will analyze the most primitive mount - a wedge. You are probably familiar with him since childhood - on the Soviet and Russian hardtail type "Desna" connecting rods were attached that way. Now this type of mount is also used, as a rule, on models of a low price category. To remove the connecting rod secured by the wedge from the axis is very simple - just unscrew the nut and knock out the wedge (it is better to strike through the plate so as not to damage it, otherwise it is better to replace the damaged wedge with a new one). When you put the rod in place, orient it correctly and fasten it tightly enough (so that there is no play that will deform both the wedge and the axle when driving), but without undue effort, so that, again, not to damage the axle and wedge.
How to remove connecting rods using a puller
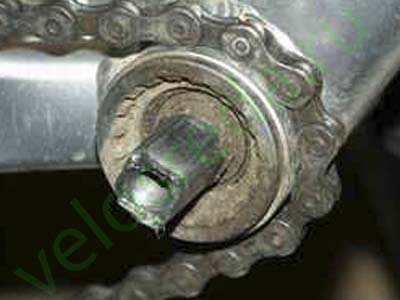
If you don’t see any wedges, that’s good. Look at the axis of the carriage - in the place where the connecting rods are attached, there is probably a plastic or aluminum plug. Most likely, it needs to be tucked up to remove, less often - unscrewed.
Under the plug is a bolt (or nut), with which the connecting rod is attracted to the axis of the carriage. Unscrew it with hexagons (less often you may need a socket wrench). Next, you will need a special tool - the connecting rod puller (aka the system puller). It can be sold separately or as part of a bicycle tool kit.
Removing cranks without a puller: sit on a bike and ride it 200-300 meters. After this, the connecting rod will be more flexible. There is a possibility that the connecting rod could “stick”, especially if it is aluminum, so do not spare grease, and it is better to refrain from heating, especially with a burner. In the event that there is a special puller (exactly the system that you have installed), carefully screw it into the threads of the connecting rods themselves. Screw in carefully so as not to break the thread, it is small enough there. After that, turning the bolt in the puller itself, you gradually pull the connecting rods from the axis of the carriage. It will be useful to note that, unlike pedals, the threads on both connecting rods are everywhere standard, right.
Before installing the connecting rods, it is very important to clean all surfaces well and coat them with grease. Thanks to lubrication, the connecting rod will be easier not only to install, but also to remove it the next time. In addition, this eliminates the potential for squeaking. And the last recommendation: make sure there is no backlash - install the connecting rod as deep as possible and tighten the fasteners with a large (but not excessive!) Force.
Article author Alexey Zheludkov
Every self-respecting cyclist knows that a bicycle crank puller is an indispensable item in a tool kit. After all, many breakdowns, such as a carriage breakdown, or for example, a breakdown of the connecting rod itself, require this part of the bike to be removed.
But the fact is that it is practically impossible to do this in simple ways - neither a hammer nor a vice helps in this matter. The thing is that over time, the connecting rod literally sticks to the mount. And here the bicycle crank puller comes to the rescue.
This simple key consists of two parts: a metal cup with a thread on the outside, and an internal bolt.
The principle of operation is also very simple. First you need to remove the plastic plug. Then unscrew the bolt that holds the connecting rod on the axle. Using an external thread, we screw the puller itself into the connecting rod, and then we begin to screw in the bolt until the connecting rod slides off the axis.
Note that before putting the connecting rods back on, they are best lubricated with grease. Contrary to the opinion of many cyclists, this will cause the connecting rod to “break up”, but the next time you remove it, you won’t have to make a lot of effort. In addition, the lubricant, on the contrary, will allow the connecting rod to be put as far on the axle as possible, which will prevent it from loosening later, even under heavy loads.
Here is a visual guide on how to remove the connecting rods from a bicycle:
Often among cyclists, the problem arises that they say different pullers are needed for different types of fastening. Indeed, the square puller has a narrow tip, and for other types of fasteners you need a wider option.
In fact, this problem is quite simple to solve: we take a coin and put it at the end of the bolt. The main thing is to choose a coin of this size so that it lies on the end of the axis completely from all sides.
As you can see, the purchase of a second puller is not required. Also remember one important rule: if you are traveling on a long trip, and take a spare carriage with you (and you must take it), always take the connecting rod puller with you, because in the event of a breakdown you will not be able to remove the connecting rods in the field. Yes, and not the fact that the workshop will work.
When buying a puller, make sure that it is not Chinese, since when removing the connecting rods, it has a heavy load, which means that the thread from the Chinese plastic metal can not withstand and break. In this case, the thread on the connecting rod itself may be damaged, which is likely to lead to one method of removal - the Bulgarian.
If you are going to remove the connecting rod for the first time, then keep in mind that it could “stick”, so spray WD-40 half an hour before removing it. The lubricant will penetrate the cracks and possibly weaken the grip - then the process will be easier.
Before you put the rod back on, do not forget to also clean it WD-40, after which, as mentioned above, grease it with grease, and then put it on. In order for the connecting rod to fit tightly on the axle, it can be tapped with a hammer, after putting a rag in order not to damage the connecting rod cover.
Here, in principle, are all the basic tips related to removing cranks from a bicycle. I hope they help you repair your bike.
Today we talk about connecting rods for bicycles and how to change them, what are the pullers for connecting rods and how to remove the connecting rods from the bicycle.
Connecting rods
Cranks are one of the most heavily loaded bicycle parts. On domestic road bikes they are made of steel, and on imported and sports ones - from aluminum alloys. To reduce weight and maintain strength, manufacturers embark on various tricks - they make them hollow, having intricate cross sections.
Sometimes (often on inexpensive bicycles), the block of front sprockets is made in the form of a non-separable structure, combined with the right connecting rod, and then when replacing the sprockets, both rods must be changed. On bicycles of the middle and upper price categories, the front sprockets can usually be disconnected from the right connecting rod, that is, they can be changed independently, as the teeth wear.
The need to replace the connecting rods also occurs when they are broken or damaged. It is necessary to remove the connecting rods (one or both) in order to get to the carriage (to adjust or replace it).
The connecting rods do not require any adjustment.
Usually new connecting rods are purchased with front sprockets.

When buying new connecting rods, it must be borne in mind that there are several types of carriages that differ in the type of axle. It is necessary to choose connecting rods compatible with the existing carriage. In addition, connecting rods are available in different lengths (from 165 to 180 mm). Too long connecting rods on a small frame can cause inconvenience when driving on rough terrain, and too short will require additional effort when pedaling.
Types of connecting rods and carriage mechanisms
| This is the OCTALINK standard. On carriages of this type, the axis has a circular cross section, and at the ends of the axis there are 8 protrusions. Bicycles of the upper and middle price range are equipped with carriages and connecting rods of this type. This type of connecting rod is used on expensive mountain and road bikes. (in particular, for SHIMANO - on DEORE LX / XT and XTR equipment, although recently it has been increasingly used in middle-price components) The rods are attracted by a special hollow bolt, under the internal hexagon by 10, and are protected from the dirt by anthers from the outside. The boot just screwed into the connecting rod. The axis of the carriage is hollow, and therefore traditional pullers do not work - they just have nothing to rest on. It is necessary to use a special puller | |
| This is a connecting rod of a traditional design. This type of connecting rod is used on mid-range bikes. (for SHIMANO - on the equipment DEORE, ALIVIO, ACERA). Although the new equipment of these classes began to use OCTALINK. The connecting rods are attracted by a screw that is screwed into the axle. The screw has a head for an internal hexagon of 8 mm. A plastic boot is attached to the screw. | |
| Often found and this kind of connecting rods. It differs from the previous design only in that the screw that attracts the connecting rod is located under the plug - anther. The connecting rods are attracted by a bolt that is screwed into the axle. The bolt can be unscrewed with a ring spanner at 14. The end of the axis of the carriage is closed with a plastic boot. In this photo, the duster is removed. | |
| This type of connecting rod is often used on inexpensive bikes. Here, the axis of the carriage also has square sections at the ends. But here the connecting rods are attracted not by a screw, but by a nut. The nut is usually located under the duster. |
There are other types of connecting rods. For example, on the new SHIMANO equipment (in particular, the XTR2003 and SAINT groups) the carriage is made in the form of a monoblock, when the right connecting rod is structurally combined with the axis of the carriage. A special tool is needed to service such a carriage and connecting rods.
The connecting rod puller (system puller) is a tool that allows you to remove the system from the shaft of a non-integrated type carriage. Usually it combines two functions: a hexagon for disassembling pedal-toptalks and a puller itself.
The connecting rods are held on the carriage shaft with a bolt under the 8 mm internal hexagon. But just unscrewing the bolt is not enough, since the connecting rod sits with an interference fit on the carriage shaft and sometimes “sticks”, therefore, a special puller is required. It is a screw with a two-section head (socket wrench and faces for an open end wrench), onto which a specially shaped nut is screwed with internal and external threads. Often an adapter is included with the puller for use with slotted standard sliders
Removing cranks from a bicycle
In addition to the puller, an 8 mm hexagon is required. If the connecting rods (especially aluminum) have not been disassembled for a long time, you will need to fill the connection with machine oil, WD40 or some kind of "liquid wrench" so as not to break the threads on the connecting rods.
Before screwing the connecting rod puller it is necessary to make sure that the diameter of the “finger” of the puller, which will press on the square axis with the connecting rod fixed, is smaller than the size of the square hole. It happens that a movable head is put on the finger of the connecting rod puller, the diameter of which is larger than the square hole of the axis. The consequences are deplorable if you do not stop in time. The puller rests on the connecting rod itself and begins to squeeze out not the connecting rod, pushing the axle forward, but itself, “brutally” cutting the thread. Advice would be redundant if such cases did not occur.
Unscrewing the bolt, screw the puller into the connecting rod until it stops. The threads in the socket should be cleaned before this, and the puller screw should not protrude into the connecting rod (otherwise the puller will not screw in as deep as it should). Then we twist the bolt of the puller, squeezing the connecting rod from the shaft. It may take a lot of effort - be careful! If you overdo it, the thread inside the connecting rod will be broken and you will have to change it (not to mention the problems of further removal), so you should not save time on soaking in oil.
Connecting Rods
The key point is to clean all joint surfaces and generously coat them with grease. Firstly, this will make it easier and more even to install the connecting rod, secondly, it will significantly facilitate its subsequent removal, and thirdly, it will eliminate one of the most common sources of mysterious crunches and creaks “somewhere in the area of \u200b\u200bthe carriage”.
The connecting rod should be deep-seated on the shaft to prevent any backlash - otherwise, the seat jack will quickly fail. This is achieved by tightening the fixing bolts with a torque of 50-70 Nm, that is, with a very large force.