How to remove connecting rods from a bike with a puller. How to remove connecting rods from a bicycle without a puller. Mounting to the carriage shaft happens
The need to remove the connecting rod appears when it is replaced, the installation of new stars, adjustment or dismantling. The connecting rods are displaced by the corresponding key - the connecting rod puller.
The tool is presented as a screw having a two-section head. One section has the form of a nesting key, the second - faces under the open-end wrench. A screw of a unique configuration is screwed onto the screw, equipped with double-sided thread inside and out. Usually the puller is supplemented with an adapter, necessary when working with the carriage elements of the spline joints.
Strength is critical in the connecting rod. The forces that stretch and compress the rods exert tremendous force on the portion of the beam of the rod. If the rod fails, it will most often move apart along the piston and not bend during the downward stroke of the piston. The rod may also fail if the bearing soaks the oil, grabs and breaks the rod.
Exceed these limits and you will need more reliable rods. Most top dragsters and fun cars use aluminum rods in their engines. Aluminum rods have a limited service life because they can stretch and tire in such high voltage motors. In low-resistance racing classes, a set of aluminum rods can last from 100 to 200 runs or longer. Aluminum rods can work outdoors, but this requires a high quality alloy.
It is necessary to make a purchase of new connecting rods taking into account their manner of fastening directly to the carriage. The mount is square and slotted. The latter option involves several standards. In parallel, the length of the purchased connecting rod is taken into account. So, the excessive length of the connecting rod creates obstacles when the vehicle is moving over rough terrain. Short cranks, in turn, will require additional effort from the rider.
For this reason, many engine manufacturers prefer sticking to steel rods for their proven durability. Titanium rods are another option for those with deep pockets. Titanium is light in weight and has the same strength as a steel rod, but titanium is expensive and difficult to manufacture. If you can afford it, great! Otherwise, they are probably too expensive for a regular street performance client or weekend rider.
The length of the bar is another choice you will need to make when choosing a set of bars. Rod coefficient is the length of the connecting rod divided by the stroke of the crankshaft. Many engine manufacturers say a rod ratio of 57 to 67 works best. A longer shaft ratio can make the engine torque more sharp.
When you need to remove the connecting rod
Usually the connecting rod does not need maintenance and special care. You can resort to replacing this part in three cases:
- Since low-cost bike models are equipped with a non-separable connecting rod block with sprockets, the design is completely replaced. Both new sprockets and two connecting rods as a whole are installed. Given that a non-separable assembly is considered to be a very inconvenient and impractical option, it is advisable to replace it with a design with a detachable connecting rod and star joint.
- Subject to mechanical damage. The inevitability of removing the connecting rod is due to the need to get to the carriage part, which sometimes requires disassembling, lubricating, washing, adjusting settings.
- When an unpleasant creak occurs, which usually appears after rainy weather. As a result, sand enters the connecting mechanism. Then the connecting rod is disassembled, and the seat is cleaned.
Step-by-step guide for removing cranks from a bicycle
To remove the connecting rod from a personal bicycle, the following sequence must be observed.
Another option is to use rods that do not have wrist bushings. But this requires a highly polished pin hole and a low friction coating on the wrist pin to prevent the pin from hanging. The type of bolts used to secure the rod cover to the rod is also important. The stronger the bolts, the better. Low quality bolts can stretch and allow the cap to wander, resulting in destruction of the shaft and bearing. Reducing the oil gap between the shaft and the main bearings and the crankshaft has several advantages.
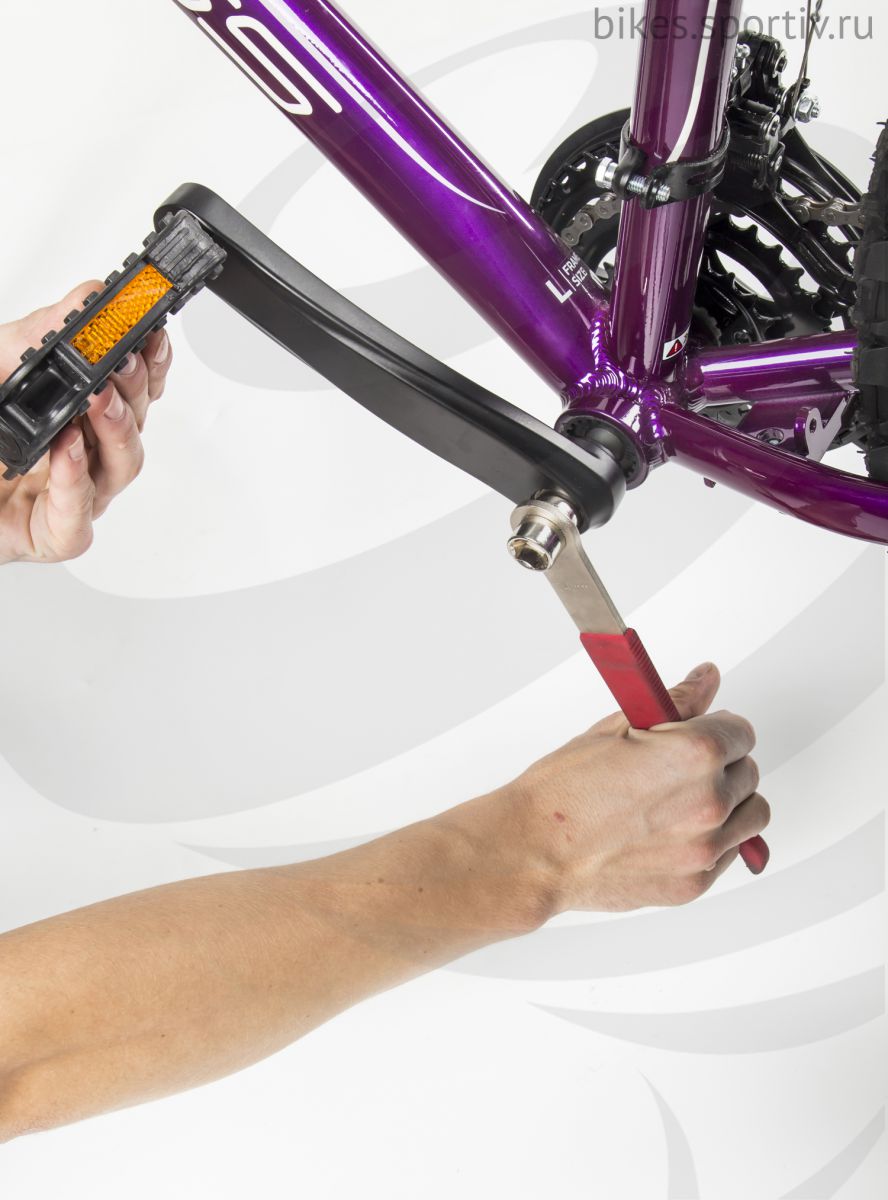
- Removing or unscrewing the boot cap. A certain part of the plugs is easily hooked by a conventional screwdriver, but there are those that require twisting.
- Unscrew the bolt / nut that draws the connecting rod directly to the carriage, and then remove the washer, if any. The procedure is carried out with a ring spanner mainly at 14. As an alternative, you can use the hexagon at 8 with a square connection, and at 10 it is suitable for a spline connection.
- Using the connecting rod puller to completely unscrew the internal screw.
Attention! Since the square connection implies a narrower internal screw, the adapter pad on the key plane is removed. The spline connection is characterized by a wider hidden screw, so the adapter plate is put on. Be vigilant, because there are known moments when the installer left the pad, which is fraught with focusing on the connecting rod instead of the proposed carriage axis. As a result, the thread on the connecting rod was disrupted.
- Screwing the puller into the connecting rod. The puller is fully twisted. If you do not tighten completely, there is a high probability of thread breakage and damage.
- Tightening the internal screw of the puller. A wrench is required to tighten the screw clockwise. There will be a noticeable shift of the connecting rod from the point.
- As soon as the connecting rod was removed, the puller is loosened. If there are difficulties with the removal of the connecting rod, there is no need to be too zealous, since the thread will break and dismantling will only become more complicated. In this case, it is advisable to oil the compound or spray it with WD-40 aerosol, and then try again.
In the absence of a connecting rod puller, it is allowed to resort to unscrewing the bolts that tighten the connecting rod with the carriage. Without details, you can drive some hundreds of meters. Such a short trip contributes to the easy removal of the connecting rod. It remains only to knock on it with a wooden block or stick. Sometimes a different method is used: the connecting part of the connecting rod with the carriage is heated somewhat. It is forbidden to use burners as the connecting rod will be damaged. Heating is done by pouring hot water.
A smaller clearance distributes the load over a larger bearing surface and distributes the pressure more evenly throughout the bearing. The bearings support the crank and carry the forces that act on the rods when they return back and forth. A thin film of oil is all that separates the bearing from the crank rings, so bearing clearances, as well as oil viscosity and oil pressure, must be considered when building an engine for a particular application.
One crankshaft manufacturer said that the larger the ribs on the handle, the more permissions you must allow so that the oil can completely bypass the bearing. If you install too close together, you risk rotating the bearing. In some cases, tight play provides the right combination of shaft diameter, bearing clearance, oil viscosity and oil pressure. A tighter bearing clearance increases the load on a slightly wider arc on the bearing, while a larger bearing clearance will concentrate the load on a narrower strip of bearing surface.
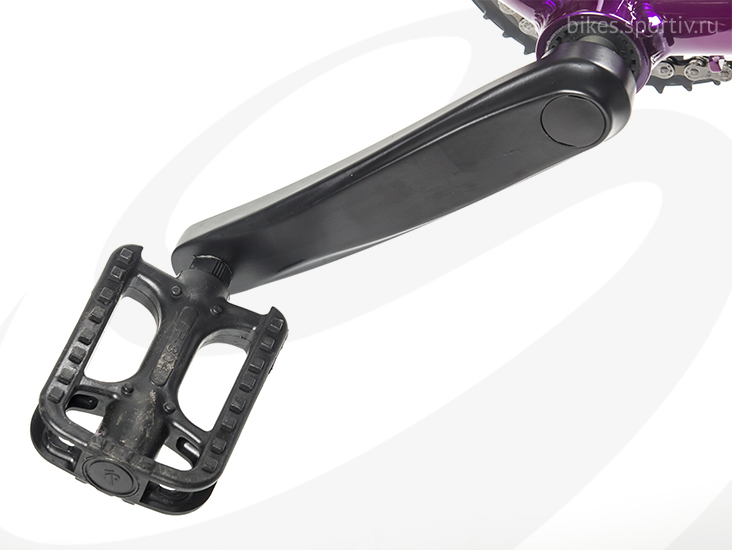
If there is a need to remove the pedals, they are first unscrewed, and then the connecting rod.
Installation of connecting rods on a bicycle
- Before installing the connecting rods, the connecting sections of the connecting rod with the carriage are first cleaned of dirty impurities. After that, the inside of the connecting rod is oiled.
- When the right connecting rod is installed, put the chain directly on the carriage assembly. Then the connecting rod is inserted directly onto the axle, followed by tightening the tightening screw.
- As for the left connecting rod, it is important to maintain the correctness of its position and not to confuse anything. The bolts are tightened completely. Inadequate tightening often causes backlash when driving.
The process ends with putting on anther caps and a bike chain directly on the star. - Installation completed.
Removing the connecting rods from the bike. Why might this be needed?
Distributing cargo over a larger area of \u200b\u200bthe bearing works well on an engine with endurance and on an outdoor engine, as it reduces metal fatigue and extends the bearing life. Crank heads also have excellent geometry and are finished with precise tolerances. Tighter clearances and thinner oils mean less oil pressure to keep the bearings in the grease, so oil pressure can be reduced to reduce the amount of energy needed to drive a wet oil pump.
Oil solvents also reduce friction, which saves power. The disadvantage of thinner viscous oils is that oil can drain bearings faster. When a race car sits all week without a run, the bearings may be dry when the engine lights up. Heavier oil will cling to the bearings better, but this will require more free space, so it will be easier to flow around the bearings.
- to replace them (in case of failure, for example),
- to get to the carriage (to replace, repair or lubricate it),
- to remove the creak (sometimes sand falls into the junction of the connecting rod with the axis of the carriage).
Although the connecting rods are one of the busiest parts of a bicycle, they have a simple shape, they do not require any adjustment and adjustment, therefore, difficulties with removal and installation usually do not arise. To completely remove the chain to remove the connecting rods, by the way, is not necessary, just throw it off the front sprockets.
Types of connecting rods and methods for their fastening
It goes without saying that when assembling the engine, the diameters of the journals and the fitting of the bearings should always be measured. Never assume that everything was manufactured to specifications or was precisely installed in a box. Mistakes happen! Magazines with a high-performance crank should be perfectly rounded and polished to specifications.
Regardless of whether the engine is internally balanced or externally balanced, good balance is essential for the durability of the crank and bearing. An imbalance in a rotating installation creates trembling forces that can eventually fatigue the metal. The imbalance grows exponentially with the engine speed, so the higher the engine, the higher the force created even by a small imbalance.
Please note that on inexpensive bikes, the block of front sprockets can be a single unit with the connecting rod, so when replacing the stars you will have to change both connecting rods. On other bicycles, the stars and cranks can be changed independently of each other. It is also important to note that you can’t just take and buy the first connecting rod that comes across. Firstly, there are several types of carriages that differ in the type of axis, so choose compatible ones. Secondly, connecting rods are produced in different lengths (difference ≈1.5 cm). The shorter it is, the harder it will be to pedal (since the lever’s shoulder is shortened), and the longer it will be, the harder it will be to ride on rough roads (the pedal in the lower position can hit the ground).
Several artisanal techniques
When choosing a replacement handle, you must match the weight of the rods, wrists, pistons, and rings for the counterweights on the handle. All crankshafts have a target weight that approaches the weights of the pistons and rods that you plan to use. The closer the target crank bit tank to the actual parts, the less time and drilling it will take to balance the crank.
The weight of the rods tends to change more than the weight of the piston due to the heavier mass. With lightweight cranks or those where the outer diameter of the counterweights has been deflected to reduce weight, there may not be enough metal in the counterweights to fully compensate the pistons and rods. This will require heavy metal blued plugs in counterbalance to balance the crank and possibly the external balance of the engine with extra weight on the flywheel and balancing balance. Heavy metal increases cost as well as extra time and labor to balance the crank.
How to remove wedge connecting rods
To begin, we will analyze the most primitive mount - a wedge. You are probably familiar with him since childhood - on the Soviet and Russian hardtail type "Desna" connecting rods were attached that way. Now this type of mount is also used, as a rule, on models of a low price category. To remove the connecting rod secured by the wedge from the axis is very simple - just unscrew the nut and knock out the wedge (it is better to strike through the plate so as not to damage it, otherwise it is better to replace the damaged wedge with a new one). When you put the rod in place, orient it correctly and fasten it tightly enough (so that there is no play that will deform both the wedge and the axle when driving), but without undue effort, so that, again, not to damage the axle and wedge.
This works well enough for most applications, including racing. But for high-power endurance engines and longer stroke engines, the addition of two additional counterweights for the central pistons provides better balance and reduces crank bending, which can lead to fatigue and malfunction. Some cranks have holes drilled longitudinally through the main logs. This does not affect balance and reduces the total weight of the crank, possibly 2 or 3 pounds. The main purpose of these holes is to allow air to move back and forth in the crankcase as the pistons move up and down.
How to remove connecting rods using a puller
If you don’t see any wedges, that’s good. Look at the axis of the carriage - in the place where the connecting rods are attached, there is probably a plastic or aluminum plug. Most likely, it needs to be tucked up to remove, less often - unscrewed.
The pan should be above the oil level in the pan, so the butter is whipped with a rotating crank, but at least an inch or more from the crank to ensure good air flow. A dry oil system that has sufficient suction to draw out the vacuum in the crankcase will solve such breathing problems by pulling out most of the air along with the oil.
- Saying that some crankshafts - cast iron is simply inappropriate.
- Cast iron is very sensitive and very fragile.
- Mike Jeff
Under the plug is a bolt (or nut), with which the connecting rod is attracted to the axis of the carriage. Unscrew it with hexagons (less often you may need a socket wrench). Next, you will need a special tool - the connecting rod puller (aka the system puller). It can be sold separately or as part of a bicycle tool kit.

Although 4 strokes are currently common, many people still use the “2 strokes” urine. In addition, when considering recreational riders and warriors for the weekend, it’s clear that two hits are not dead, so this article should be invaluable to those who pilot 2 hits when they need to be serviced.
Before going too far ahead of all of us, it’s important to note that if it ever happened that you need a factory service manual designed for a serviced motorcycle, that’s it, although if you cannot wait to get the maintenance manual The tips below will help you deal with rebuilding the top end of a two-stroke motorcycle.
Removing cranks without a puller: sit on a bike and ride it 200-300 meters. After this, the connecting rod will be more flexible. There is a possibility that the connecting rod could “stick”, especially if it is aluminum, so do not spare grease, and it is better to refrain from heating, especially with a burner. In the event that there is a special puller (exactly the system that you have installed), carefully screw it into the threads of the connecting rods themselves. Screw in carefully so as not to break the thread, it is small enough there. After that, turning the bolt in the puller itself, you gradually pull the connecting rods from the axis of the carriage. It will be useful to note that, unlike pedals, the threads on both connecting rods are everywhere standard, right.
Just keep in mind that the reason the service manual applicable to the motorcycle you are servicing is necessary and necessary is due to differences in torque and ground clearance or to specifications for wear limits between brands and displacements of individual motorcycles, as well as differences in what power valves are assembled, adjusted and synchronized, all of which are described in detail in the service manual specific to each motorcycle.
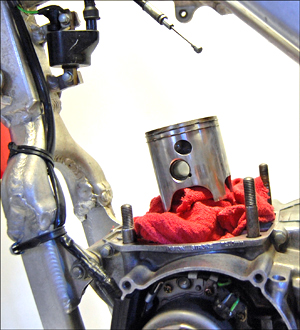
But first there’s a little more disassembly

Press on the piston of the piston. Using one of the snap rings removed on both sides of the piston using a small screwdriver, try carefully, push the piston pin to the other side.
What to do if the piston is torn
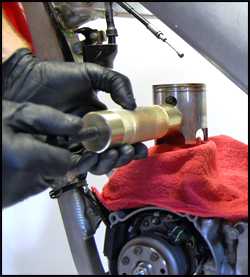
If there is a lot of resistance when trying to pull out the piston pin, it is important that you use the piston pin puller, otherwise the connecting rod and bearings may be damaged.
Before installing the connecting rods, it is very important to clean all surfaces well and coat them with grease. Thanks to lubrication, the connecting rod will be easier not only to install, but also to remove it the next time. In addition, this eliminates the potential for squeaking. And the last recommendation: make sure there is no backlash - install the connecting rod as deep as possible and tighten the fasteners with a large (but not excessive!) Force.
Article author Alexey Zheludkov